

Introduction
The Tarptent Dipole 1 Li (22 to 23 ounces / 0.62 to 0.65 kg, MSRP: ~$699) and Tarptent Dipole 2 Li (26 to 27 ounces 0.74 to 0.77 kg, MSRP: ~$799) are both modified A-frame, double-trekking-pole, double-vestibule, double-door, side-entry, single-wall, Dyneema Composite Fabric (DCF) shelters.
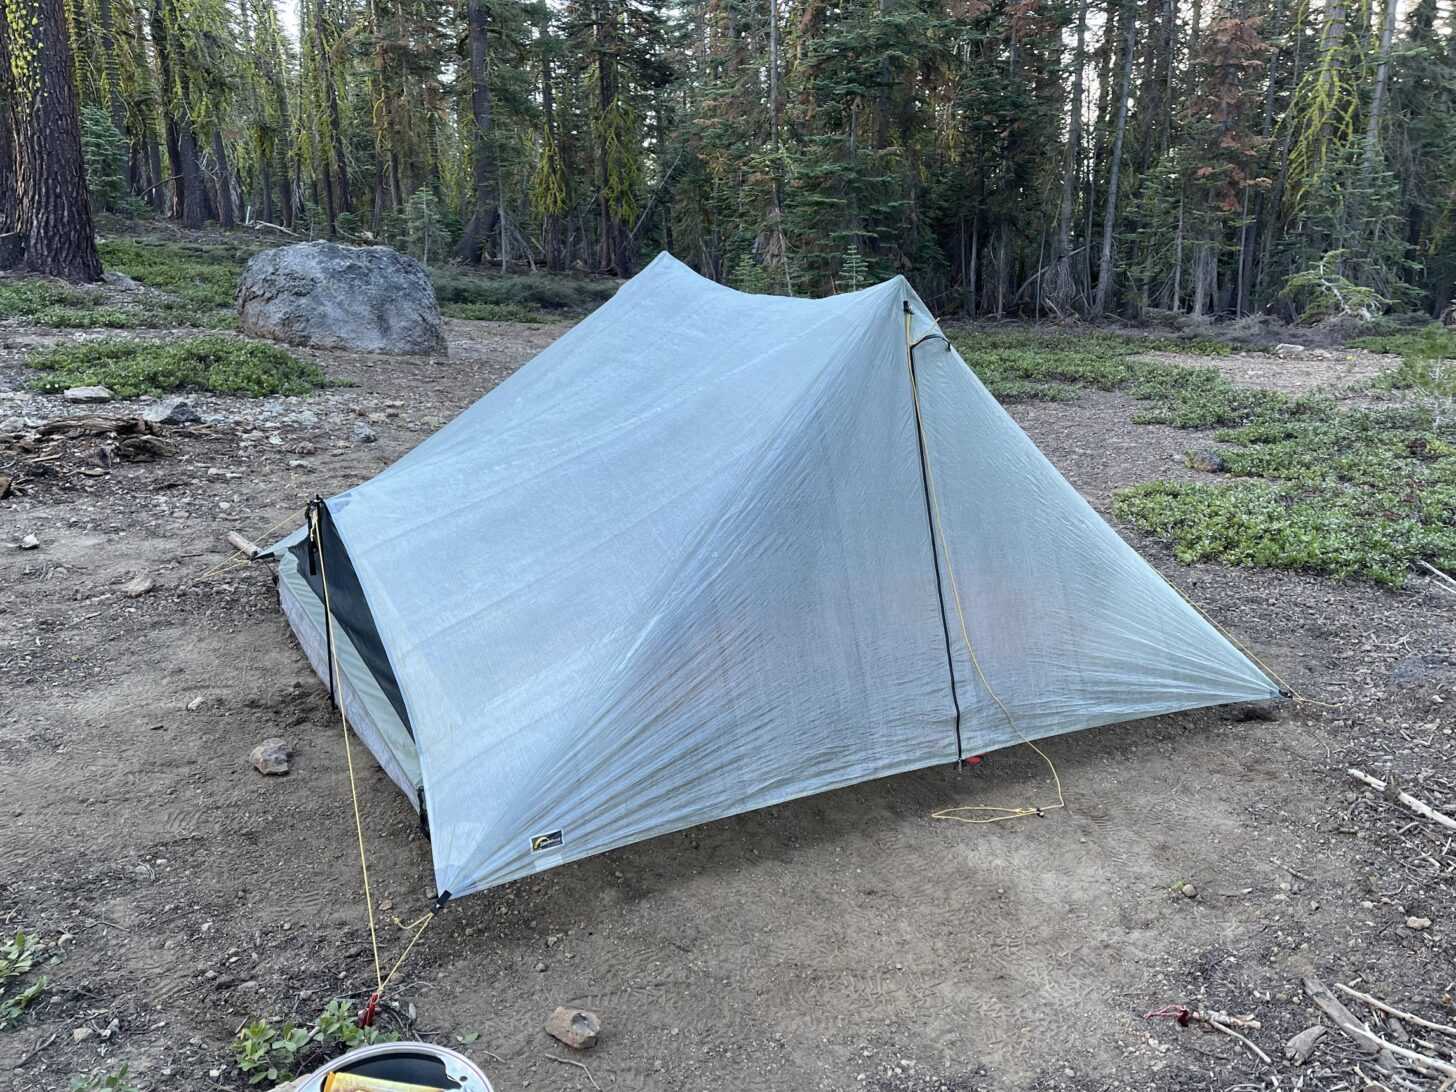
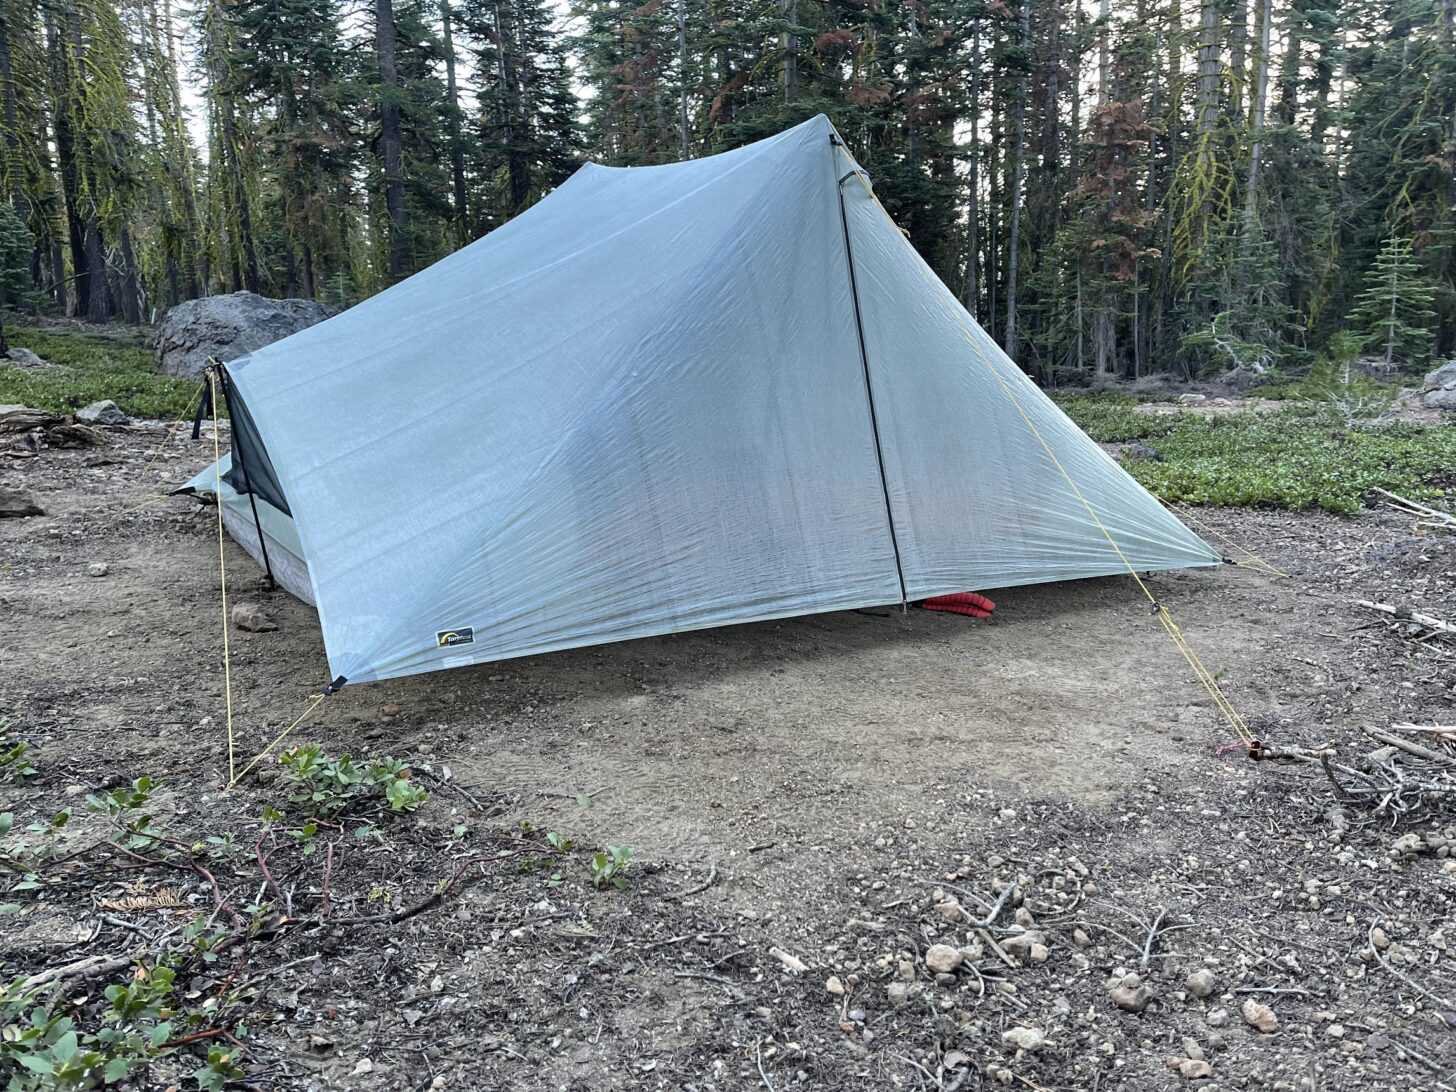 The Tarptent Dipole 2 Li in the Tahoe Basin, CA. Photo: Andrew Marshall.
The Dipole line represents a continuation of Tarptent’s use of supplemental poles (i.e., extra poles in addition to the trekking poles) to add volume and support to trekking-pole shelters. Dipole tents have several features that make them unique among two-pole, double-door shelters:
- they can maintain a stable structure with four stakes
- they can maintain a stable structure while both vestibule doors are open and the shelter is in a four-stake configuration
- they feature collapsible, removable, 21-inch (53 cm) carbon fiber struts at the head and foot that add a noticeable amount of interior livable volume while supporting the tent structure (and allowing the first two points above to be a reality)
Final Thoughts
The Tarptent Dipole 1 Li and Dipole 2 Li are not the lightest double-door, double-pole, single-wall Dyneema Composite Fabric shelters available. From conversations with Henry Shires (owner/founder) and Rob Dunne (design engineer) at Tarptent, that was clearly not the design goal. Tarptent’s primary goals were to create usable interior volume and a stable minimum four-stake setup, and at this, it succeeded.
The Tarptent Dipole 1 Li and Dipole 2 Li are the roomiest shelters in their class – that class being single-wall, double-pole, double-door trekking pole-supported shelters in the 18 to 26 ounce (510 to 727 g) range. This liveable interior volume is a combination of apex height, floor width and length, and the unique end-strut design.
Four-stake setup is stable in rain and light winds and allows vestibule doors to be open without losing tension. Tarptent’s secondary goal was to maximize ventilation and minimize condensation buildup. We like the design features they’ve implemented with this in mind, but we will need further field days with these shelters to accurately judge condensation management.
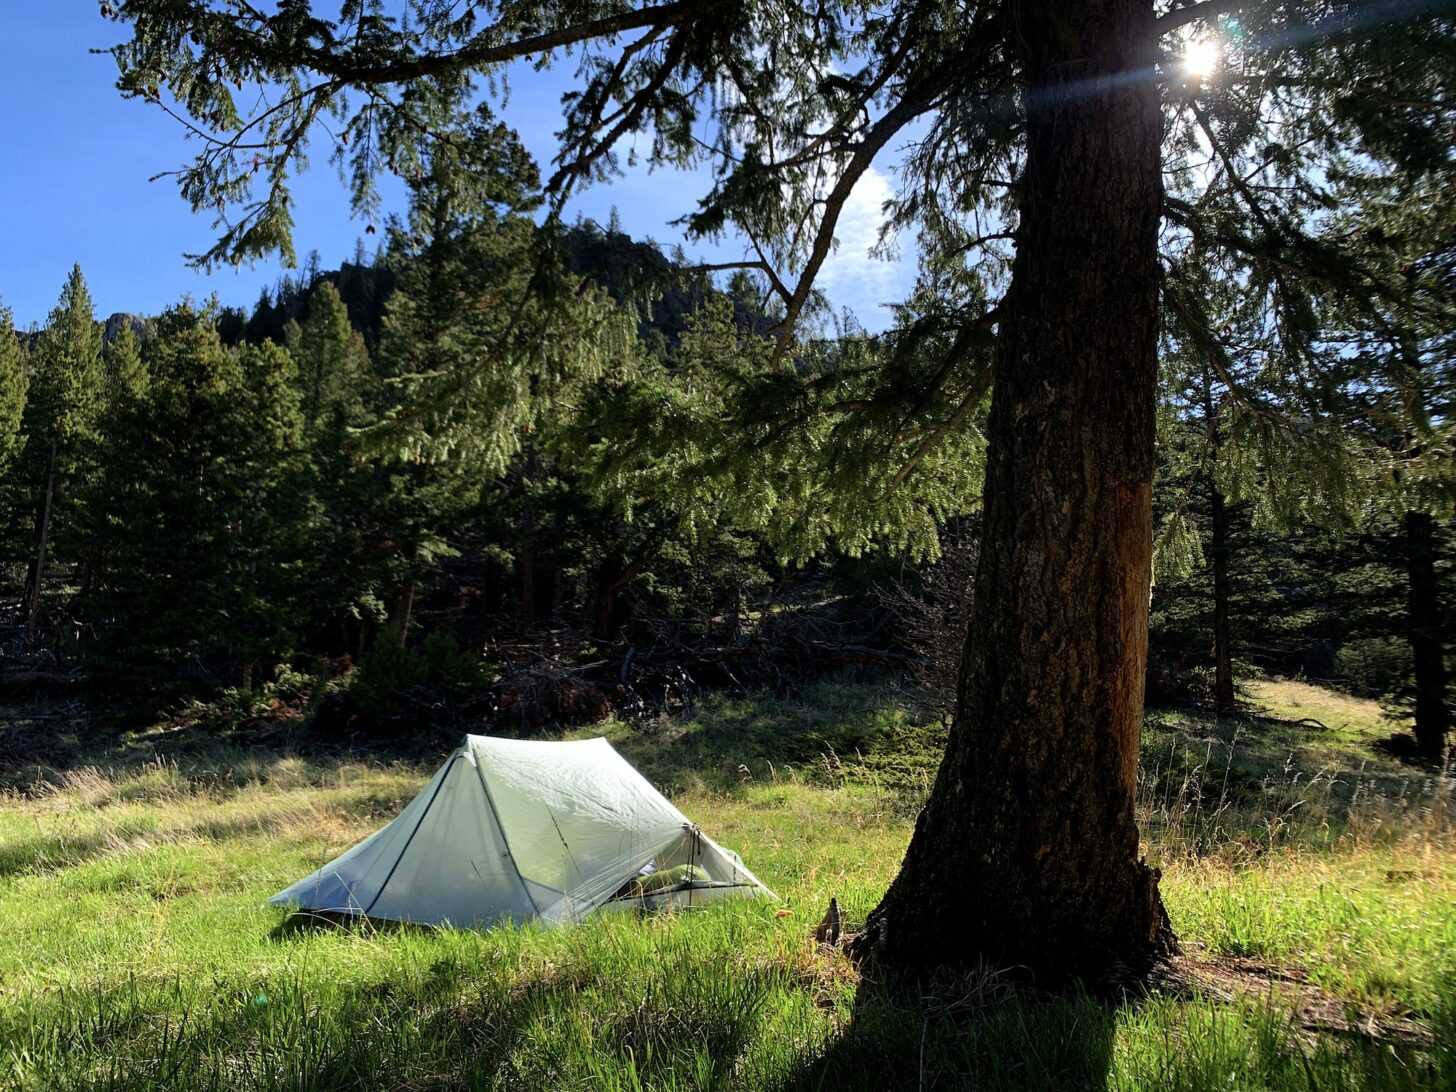 Camped under an old-growth fir at a grassy and remote off-trail pass east of Rocky Mountain National Park in Colorado. Tarptent Dipole 2 Li. Photo: Ryan Jordan
Test samples vs. final product
The samples that we tested are late-stage prototypes. Tarptent is still making adjustments to the Tarptent Dipole 1 Li and Dipole 2 Li, and some of the features visible in the photos in this article will be changed by the time the product gets into consumers’ hands. Currently, changes will include:
- very small pattern edits on the vestibules to tighten them up at the hem, especially on the Dipole 2 Li
- larger apex pole cap reinforcements
- top of the mesh reinforcement that is currently black ballistic nylon will also be changed to the lighter 210D w/Dyneema grid
- wider interior stow pockets
- the MSRPs listed above are estimates
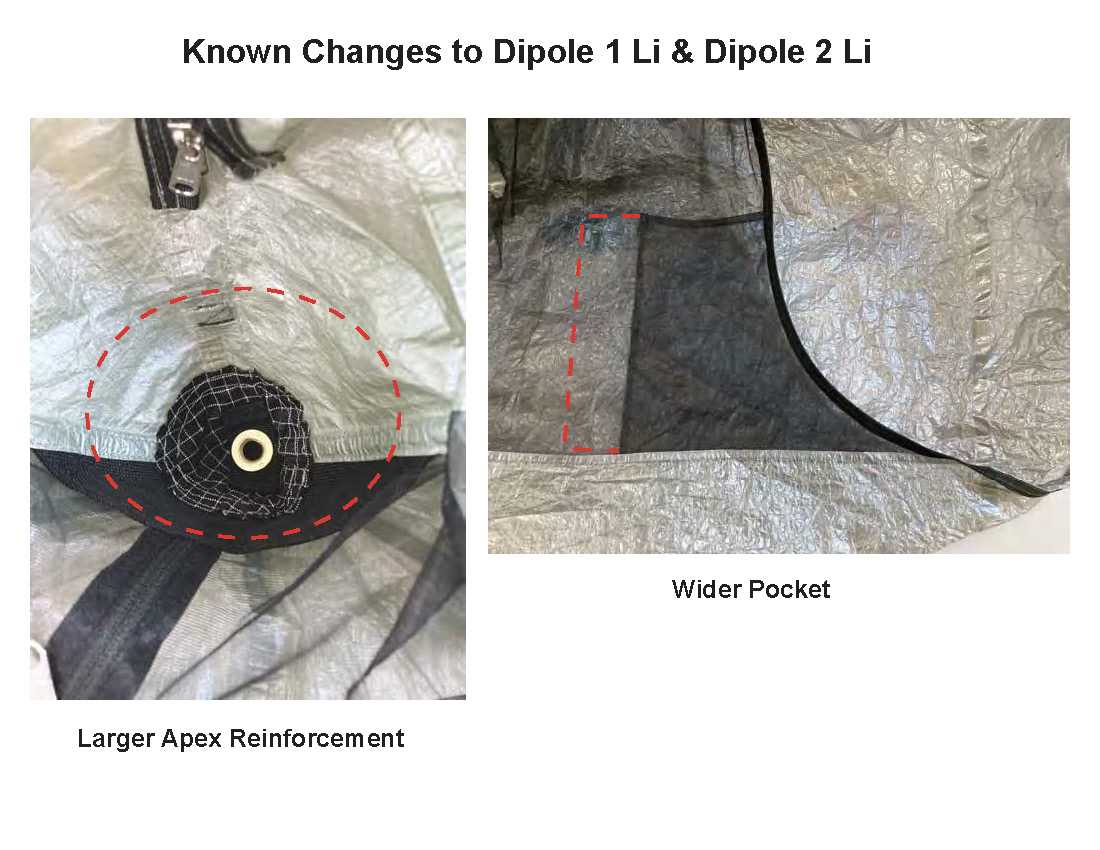
Changes to the Tarptent Dipole 1 Li and Dipole 2 Li that will be incorporated into production models include a larger pole cap and wider interior pocket. Photo: Tarptent.
First impressions
Setup and structure
The Tarptent Dipole 1 Li and Dipole 2 Li have a rectangular footprint, which makes site selection easy – certainly easier than site selection is for the Stratospire Li or ProTrail Li (non-rectangular shelters).
Setup is simple (for a trekking-pole supported shelter) but the order of operations is important – watch the video above for a setup demonstration.
Setup instructions:
- Insert the end struts.
- Stake the two corners of one end of the tent to bring tension to the fly edges between the top of the strut and the stakeout point.
- Repeat for the other end, ensuring a rectangular configuration that brings tension to the vestibule door bottom edges.
- Unzip one vestibule zipper from the top, insert a trekking pole (tip up) – 43 inches (109 cm) for the Tarptent Dipole 1 Li and 45 inches (114 cm) for the Tarptent Dipole 2 Li. Zip up the zipper.
- Repeat – insert the second trekking pole into the opposite vestibule.
- Reset corner tent stakes as needed so they are parallel with the corner seams (i.e., 45-degree angle off the parallel lines of the tent bottom edges).*
- Make sure the bottoms of the end struts are inset slightly relative to the tops, to ensure that downward falling rain doesn’t enter the end vents.
- Tighten the corner guylines.
- Tighten the guylines at the tops of the struts – this step brings the entire tent into a final state of tension. At this point, minor adjustments to pole height and position, corner tension, and corner stake location may be necessary to bring the tent into a taut stake if camping on uneven ground with minor irregularities.
*Tarptent recommends a 45-degree angle for the corner stakes (i.e., the guylines should be parallel to the corner seams). We found that a slightly wider than 45-degree angle works best for creating tension along the edges at the ends of the shelter. The photo below illustrates a pitch on uneven ground that hews very closely to the 45-degree guyline recommendation.
Note just a slight amount of slack on one of the end edges – so slight that I (Andrew) didn’t notice it until I was reviewing my photos. Adjusting the angle of the corner stakes to be slightly wider solved this issue in Ryan’s pitches (as noted in the video above).


 A slightly floppy end fly top edge (back left) was the result of experimenting with different setup techniques/processes. Like all trekking-pole-supported shelters, it takes a few setups to get the Tarptent Dipole 2 Li totally dialed in. See the text for our recommended setup step order. Photo: Andrew Marshall.
The tension created by the end struts and their triangular guyline system allows the Tarptent Dipole 1 Li and Dipole 2 Li to maintain a stable four-stake pitch that does not incorporate the doors as a load-bearing element. The upshot is that both vestibule doors can be open and rolled back without losing tension.
Livability and interior volume
There are several other features that we’ll explore more fully as we continue to review the Tarptent Dipole 1 Li and Dipole 2 Li:
- vestibule size and depth
- vent placement and design
- condensation drain placement and design
- end vent/window design and stormworthiness
- packed size and packability
- trekking-pole placement in terms of livability
- performance and stability in high winds/heavy rain/under snow load
- inner mesh door size and placement
Ryan touches on these performance issues in the video above.
But in this First Looks review, we are concentrating on the two features that stood out the most in our initial handling of the Tarptent Dipole 1 Li and Dipole 2 Li. The first was the four-stake design that allows both vestibule doors to be open without losing tension.
The second standout feature is the livable interior volume present in both shelters. The ends of the shelter are 21 inches (53 cm) tall – tall enough that feet will not rub against the shelter ceiling when sleeping pads inevitably slide down towards the end of the tent. The width and length are both designed to accommodate larger hikers. We are not tall (Andrew is five feet six inches and Ryan is five feet seven inches) but we are confident that Tarptent’s claim of comfort for backpackers six feet eight inches and over is not an exaggeration.
We believe that the Tarptent Dipole 1 Li and Dipole 2 Li are the roomiest trekking-pole-supported shelters for their weight that we’ve ever tested.
Highlights
- weight*: Tarptent Dipole 1 Li – 22.6 ounces / 0.64 kg (*pre-production prototype)
- weight*: Tarptent Dipole 2 Li – 26.3 ounces / 0.75 kg (*pre-production prototype)
- can maintain a stable structure in mild weather with four stakes
- vestibule doors are not part of the structure (both doors can be open at the same time without losing tension/stability)
- 21-inch volumizing end struts (Easton 3.9 carbon fiber) create large amounts of interior livable volume
- end struts are removable and collapsible to 13 inches (two-section, shock-cord connected)
- vestibules are 17 inches (43 cm) deep, expandable with an optional line from lower zipper pull tab to apex guyline stake (Tarptent includes hardware and guyline to accomplish this)
- Dipole 1 Li apex height: 43 inches (109 cm)
- Dipole 2 Li apex height: 45 inches (114 cm)
- Dipole 1 Li width x length: 36 x 84 inches (91 x 213 cm)
- Dipole 2 Li width x length: 58 x 88 inches (147 x 224 cm)
- single-wall design with condensation drain vents
- canopy/fly material: Dyneema Composite Fabric CT1E0.8, 0.55 oz/yd2
- floor material: Dyneema Composite Fabric CT2K.18, 1 oz/yd2
- zipper-type – canopy – YKK #3 AquaGuard
- zipper-type – interior mesh – YKK #3 coil
- catenary curved ridgeline
- mesh panel on either end, backed by a sil-poly panel that can be opened and closed from inside the tent for ventilation/weather protection
- Dipole 1 Li fits one long/wide pads and users up to 6 feet 8 inches (203 cm)
- Dipole 2 Li fits two long/wide pads and users up to 6 feet 10 inches (208 cm)
Photos
 The Tarptent Dipole 2 being tested in the Sierra Nevada. Photo: Andrew Marshall
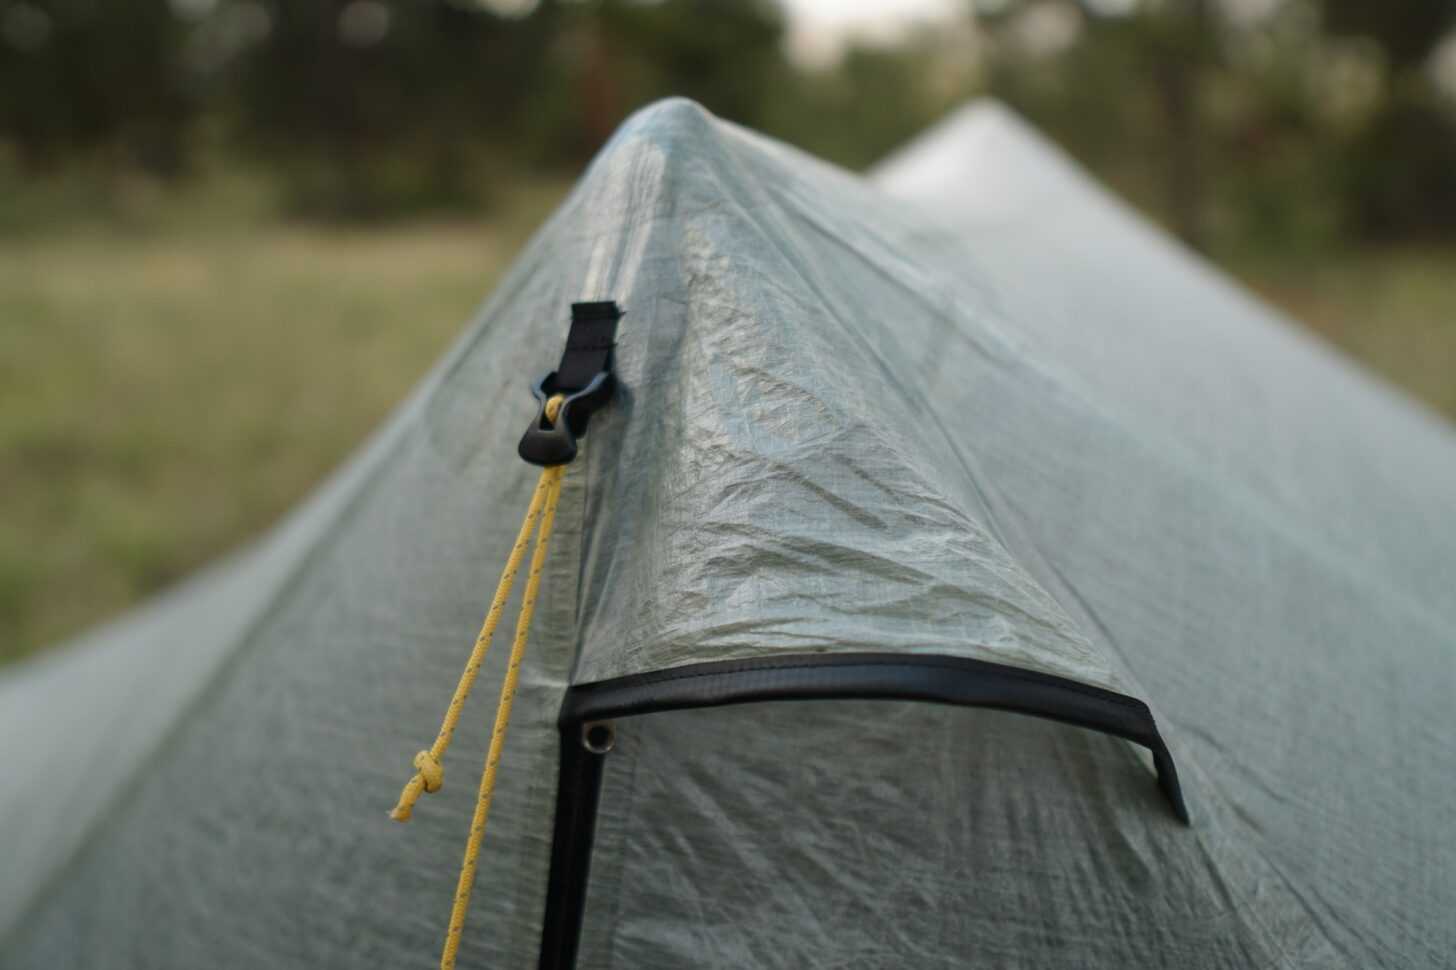 Apex guyline linelocs and peak vent at the ridgeline of a Tarptent Dipole Li. Photo: Ryan Jordan
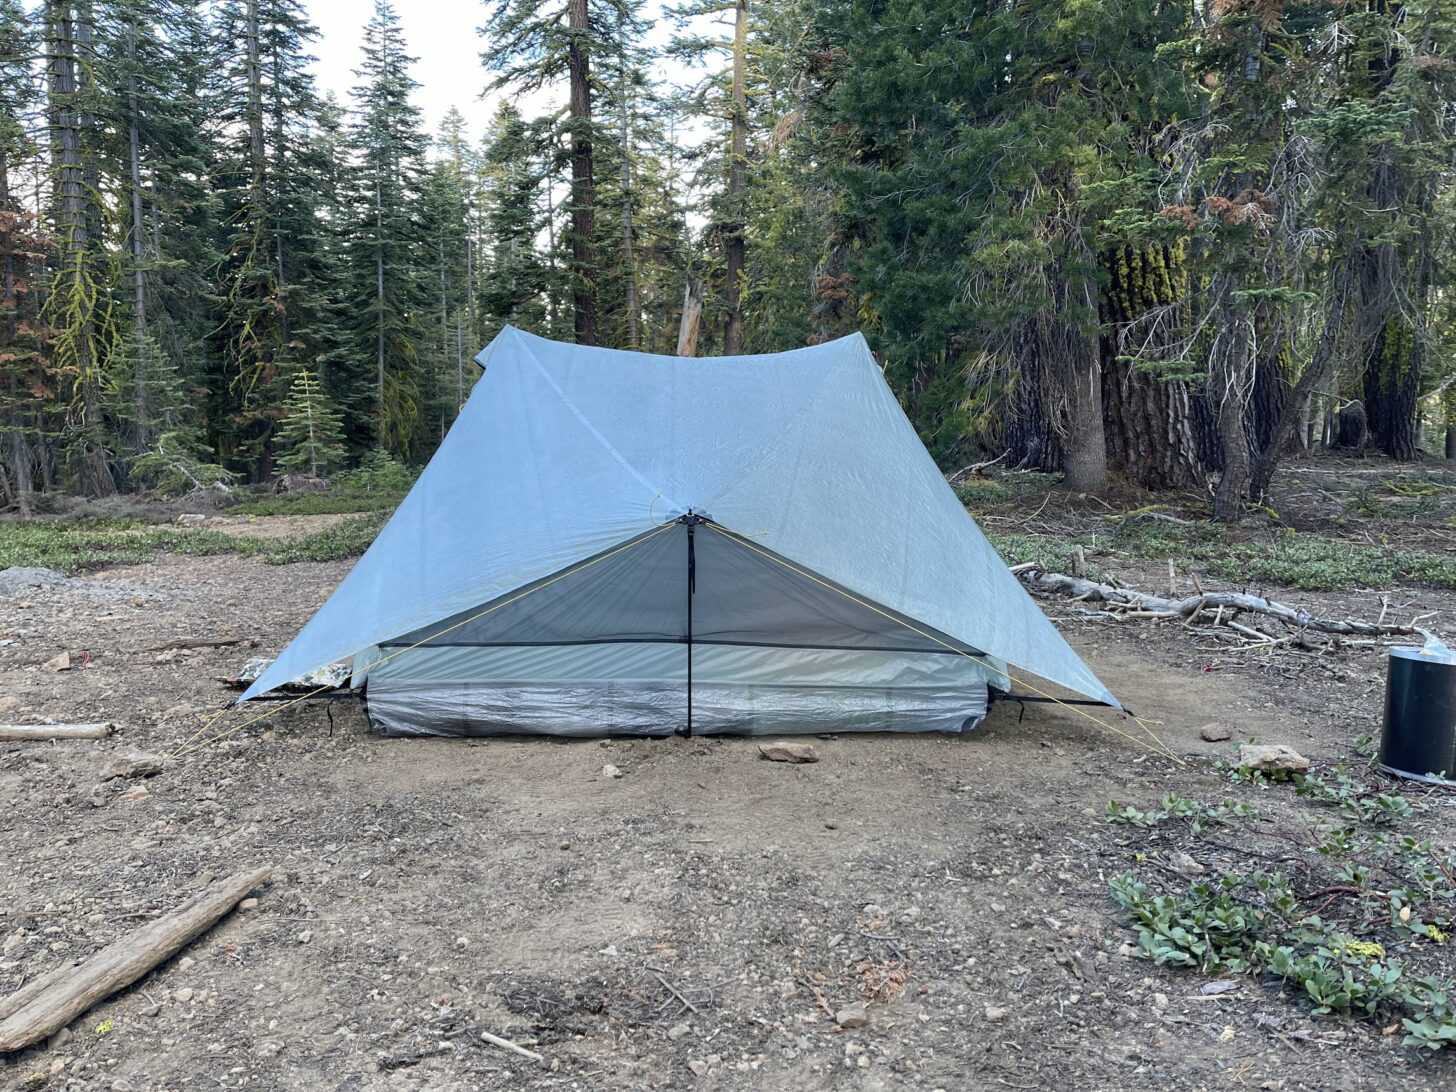 End view of a Tarptent Dipole 2 Li showing the carbon fiber strut and vented window. Photo: Andrew Marshall
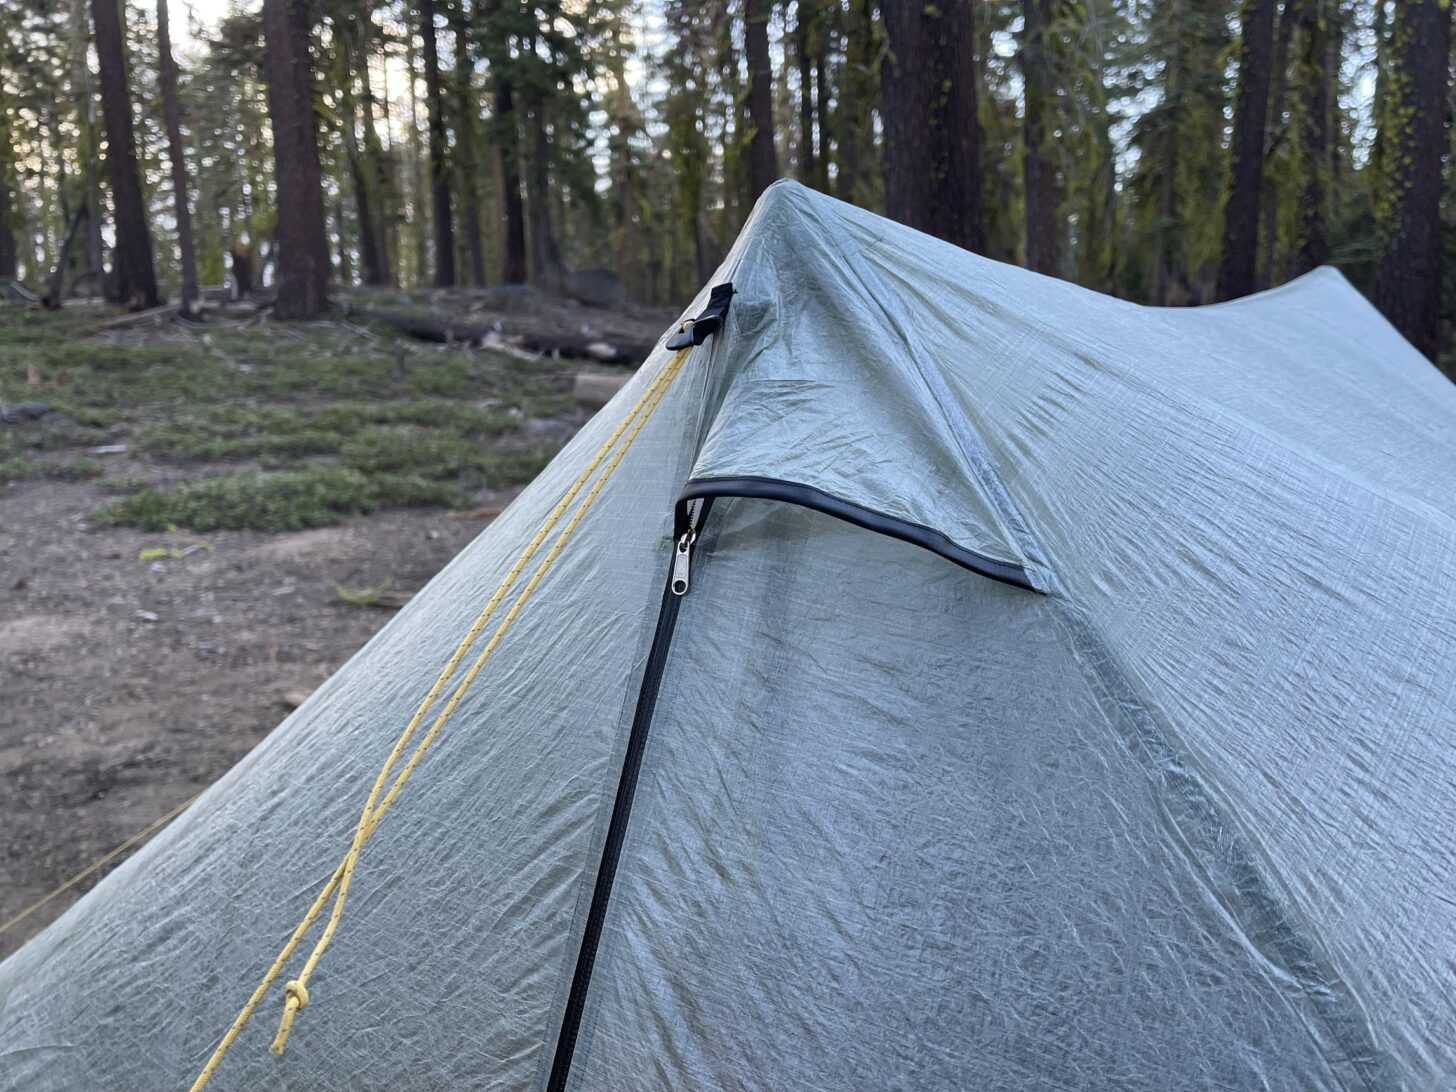 Apex guyline deployed on the Tarptent Dipole 2 Li. Photo: Andrew Marshall
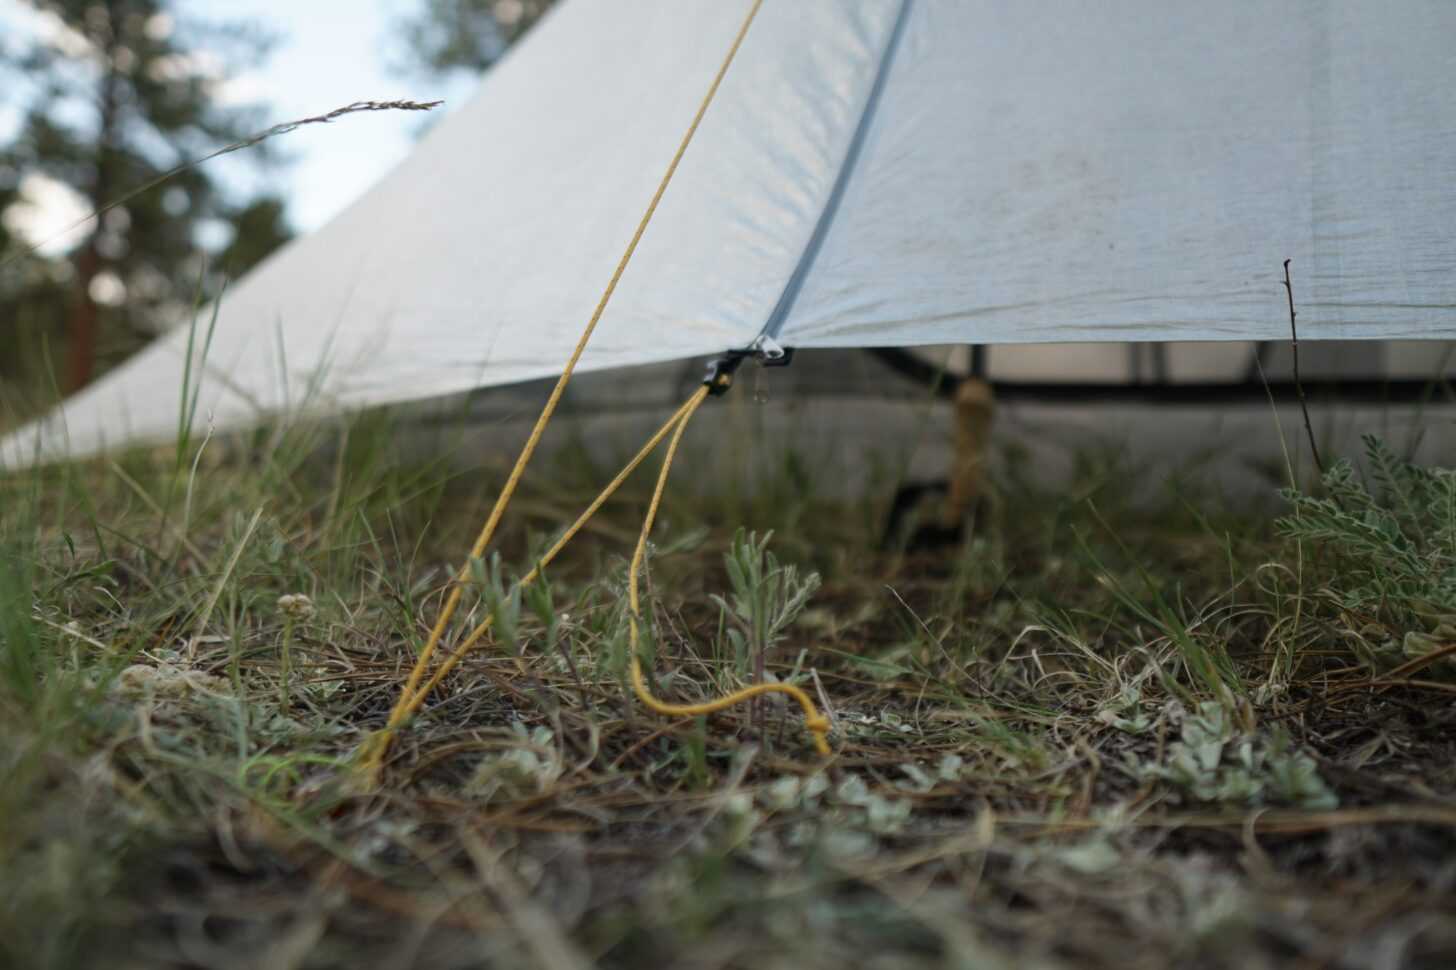 Using the apex guyline and vestibule clip to extend the vestibule on the Tarptent Dipole 1 Li. Photo: Ryan Jordan
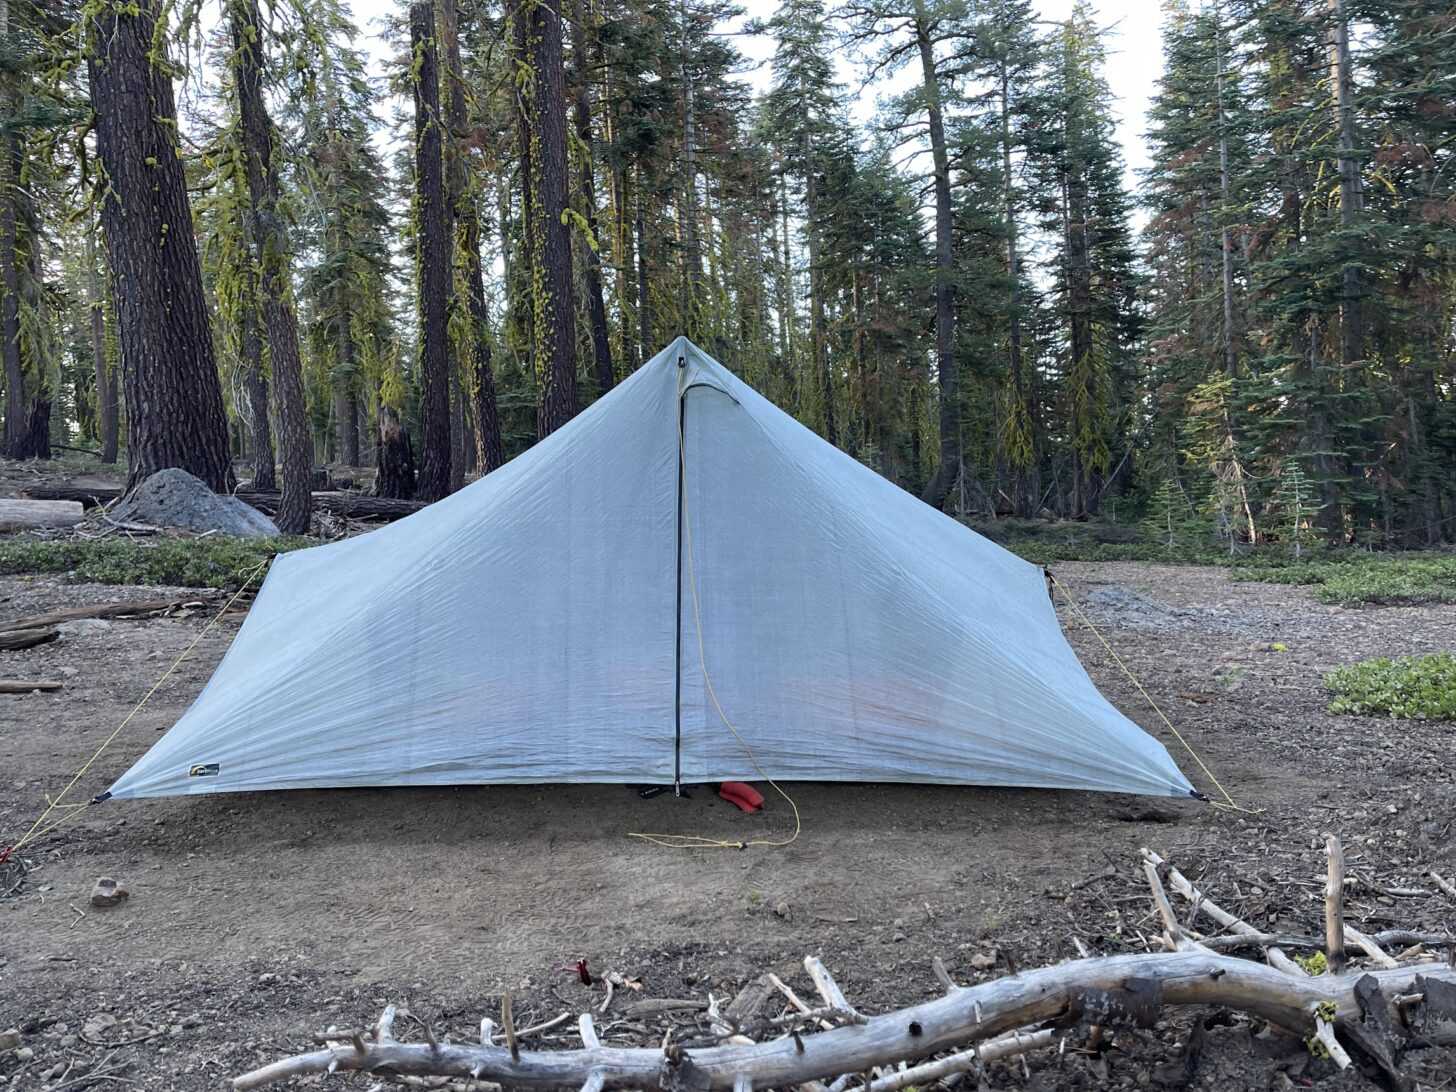 Four-stake setup of the Tarptent Dipole 2 Li – no apex guylines needed in mild weather. Photo: Andrew Marshall
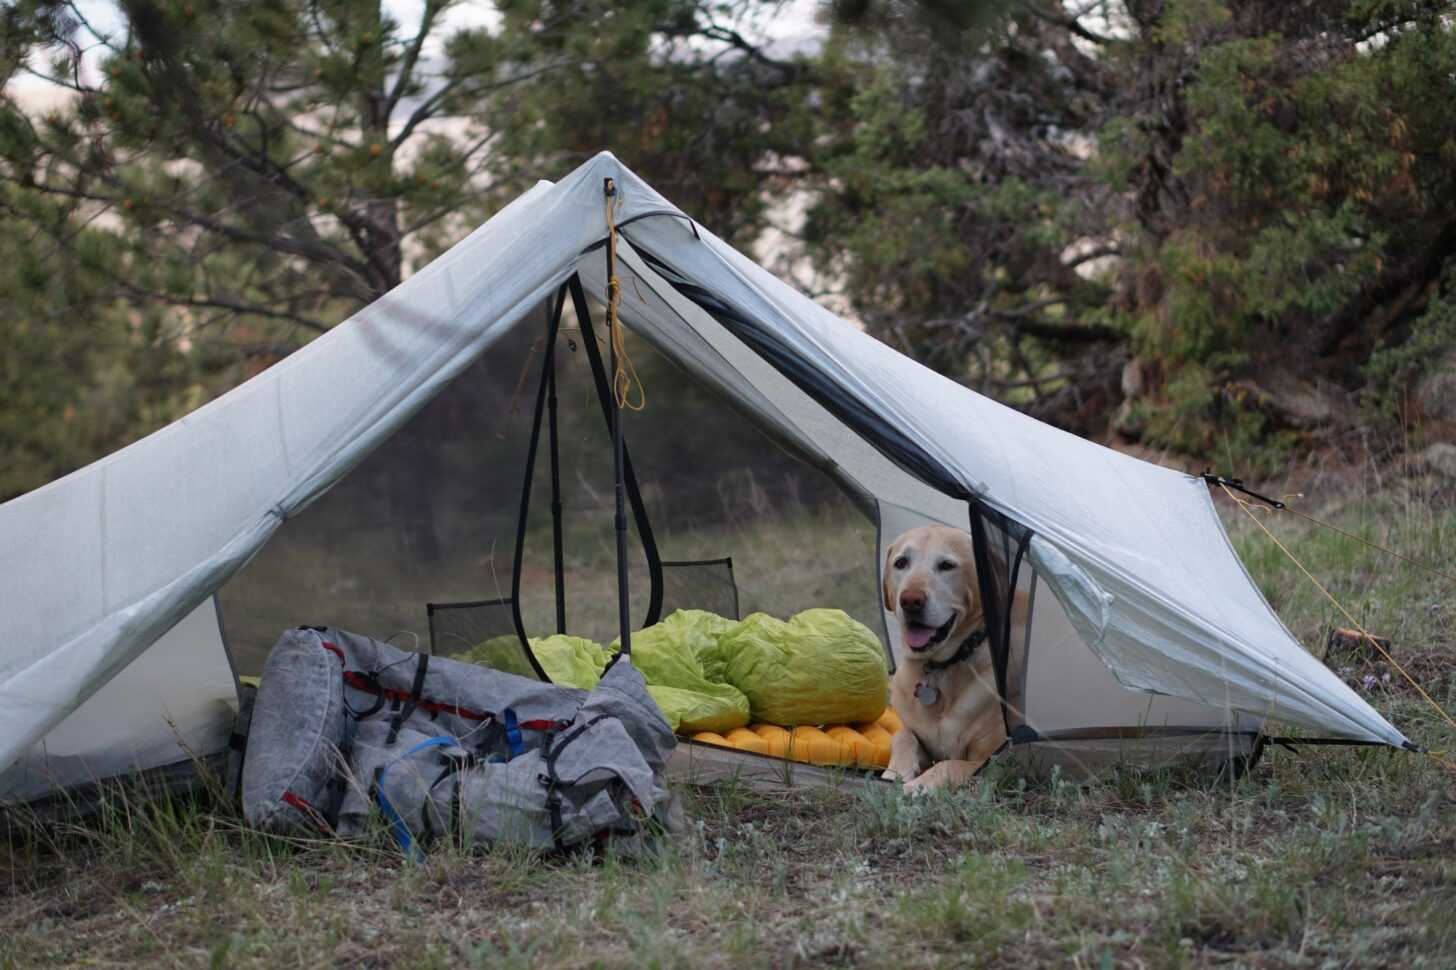 The Tarptent Dipole 1 Li with no apex guylines deployed, and all doors rolled back. You need the ventilation when camping with a dog! Photo: Ryan Jordan
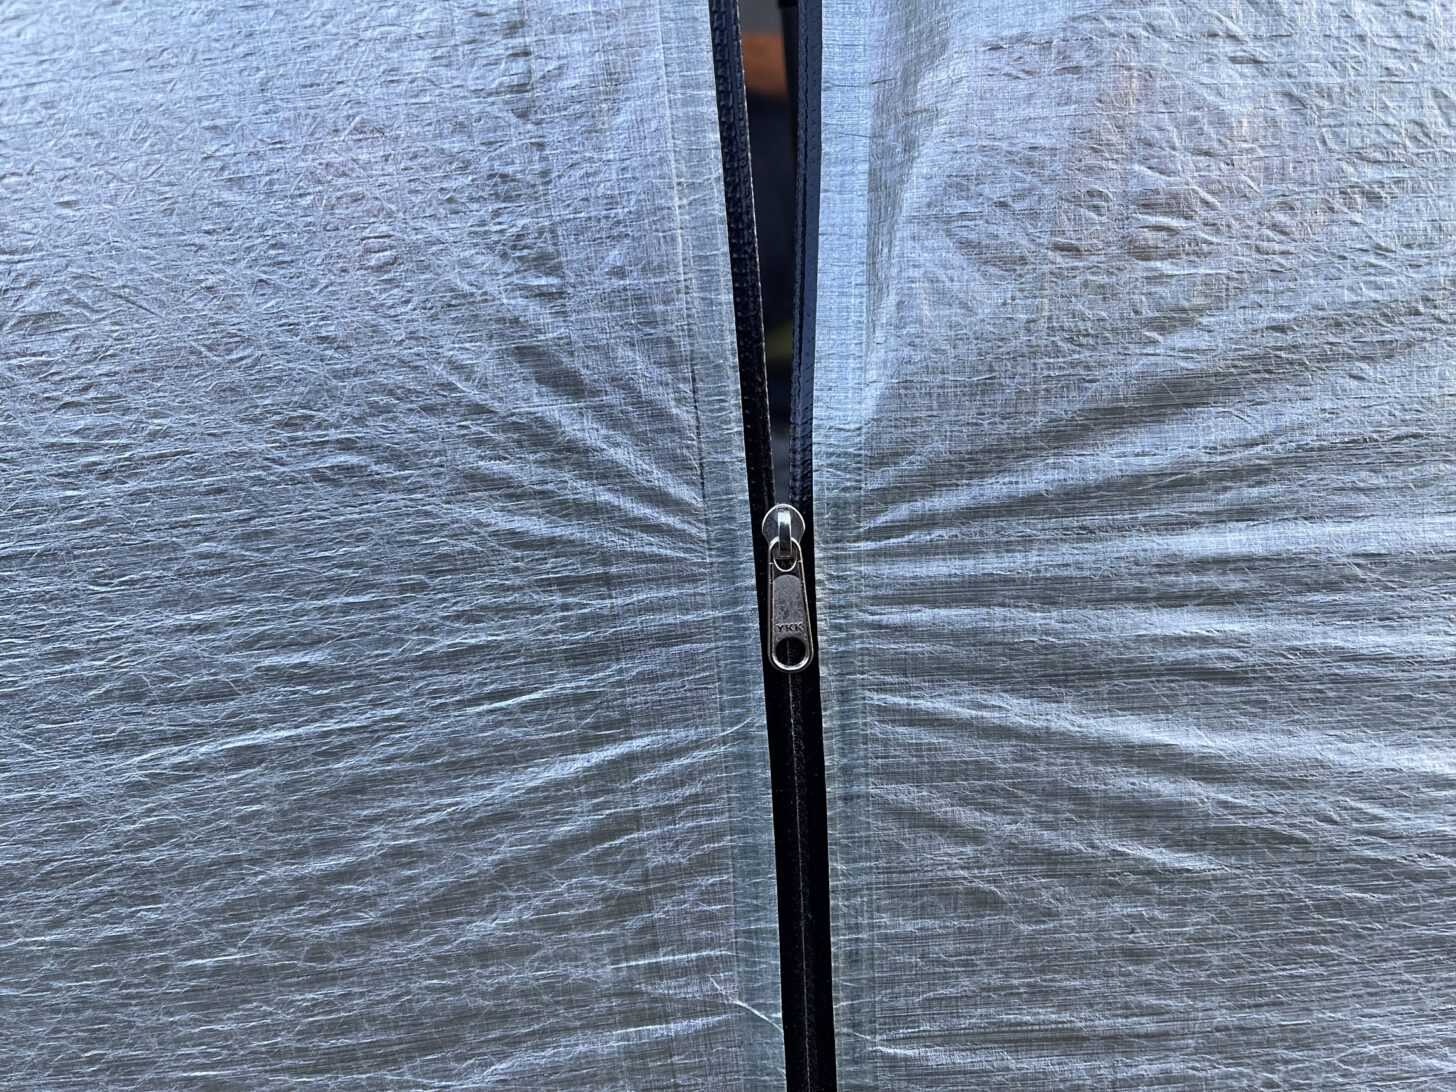 YKK #3 AquaGuard zippers on the canopy/fly. Photo: Andrew Marshall
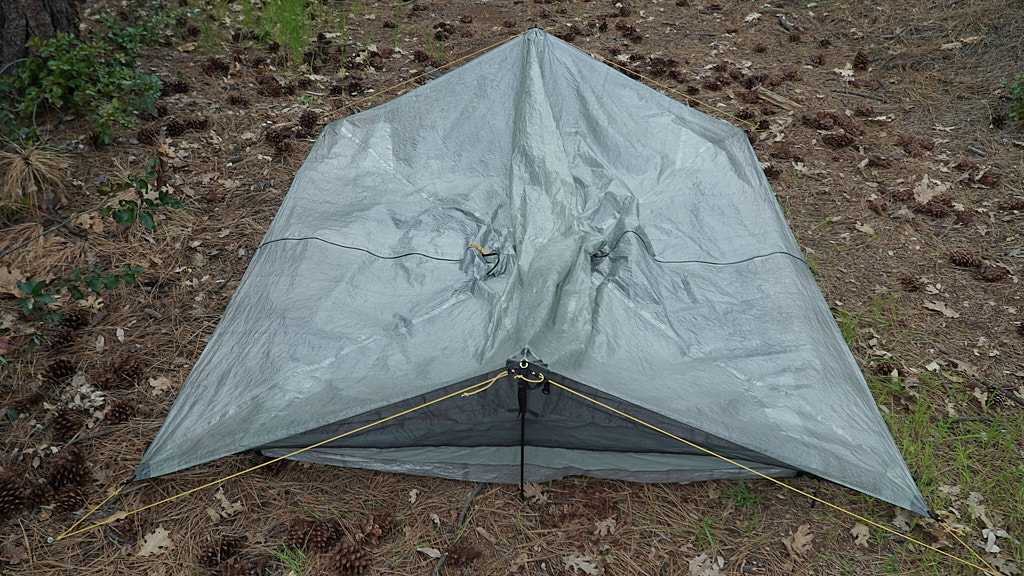
A Tarptent Dipole 2 Li shelter with the ends set up, prior to inserting the trekking poles. Photo: Tarptent.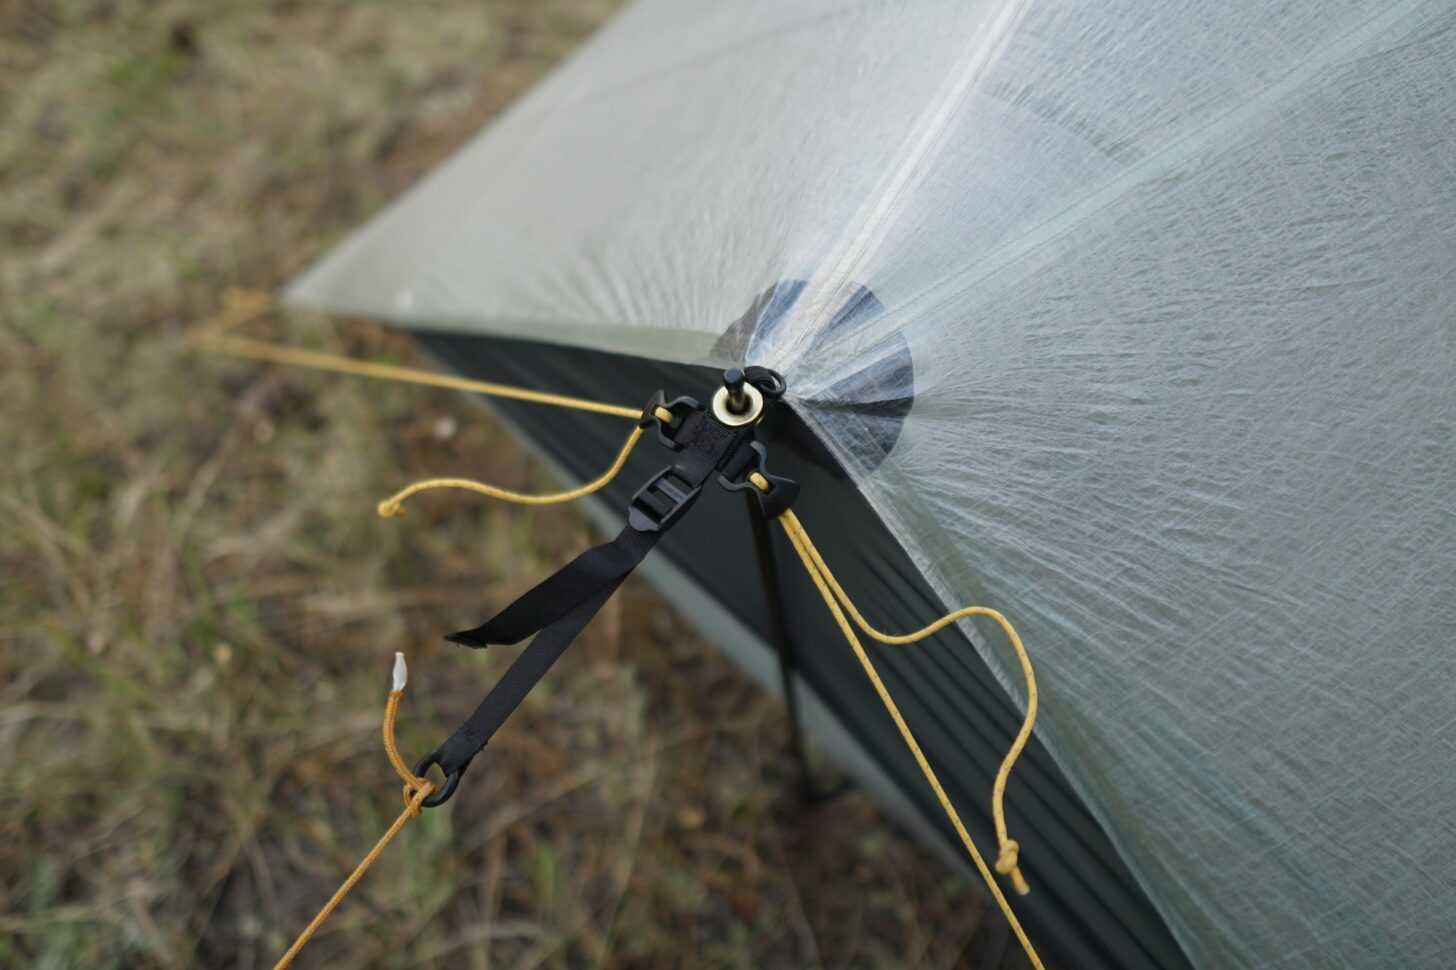 The end strut and guyline system adds volume and creates tension. Also shown here are the ladderloc buckle-and-strap end strut guyline attachment. Photo: Ryan Jordan
 Magnetic door retainers are a common feature on all Tarptent Li shelters. Photo: Andrew Marshall
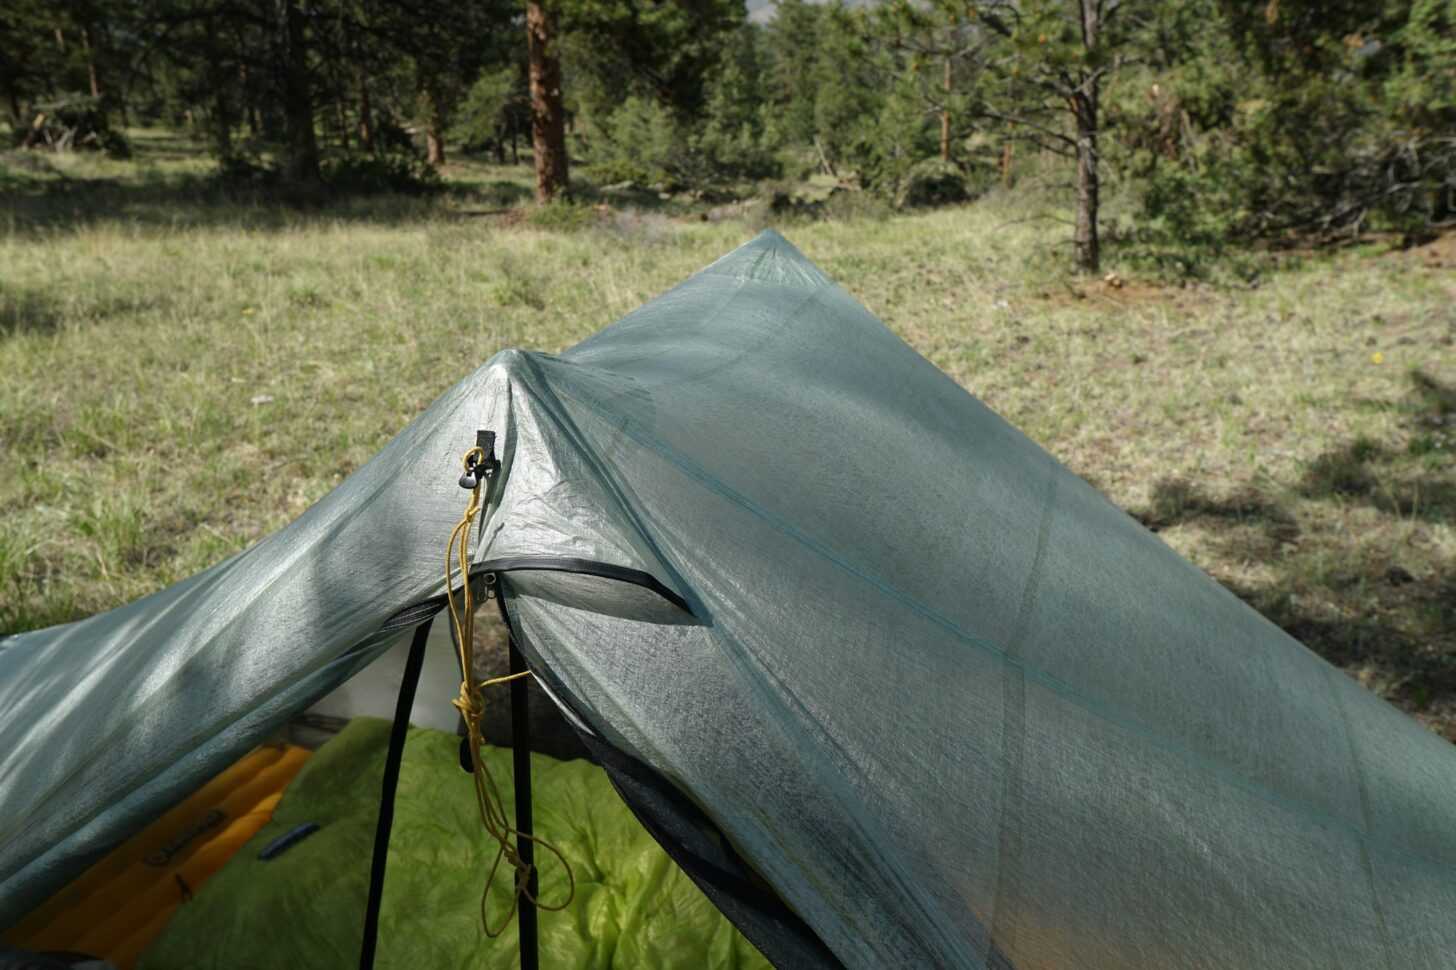 Without the apex guylines deployed, and following the setup instructions published in this article, a taut ridgeline is achievable with only four stakes. Shown here: the Tarptent Dipole 1 Li. Photo: Ryan Jordan.
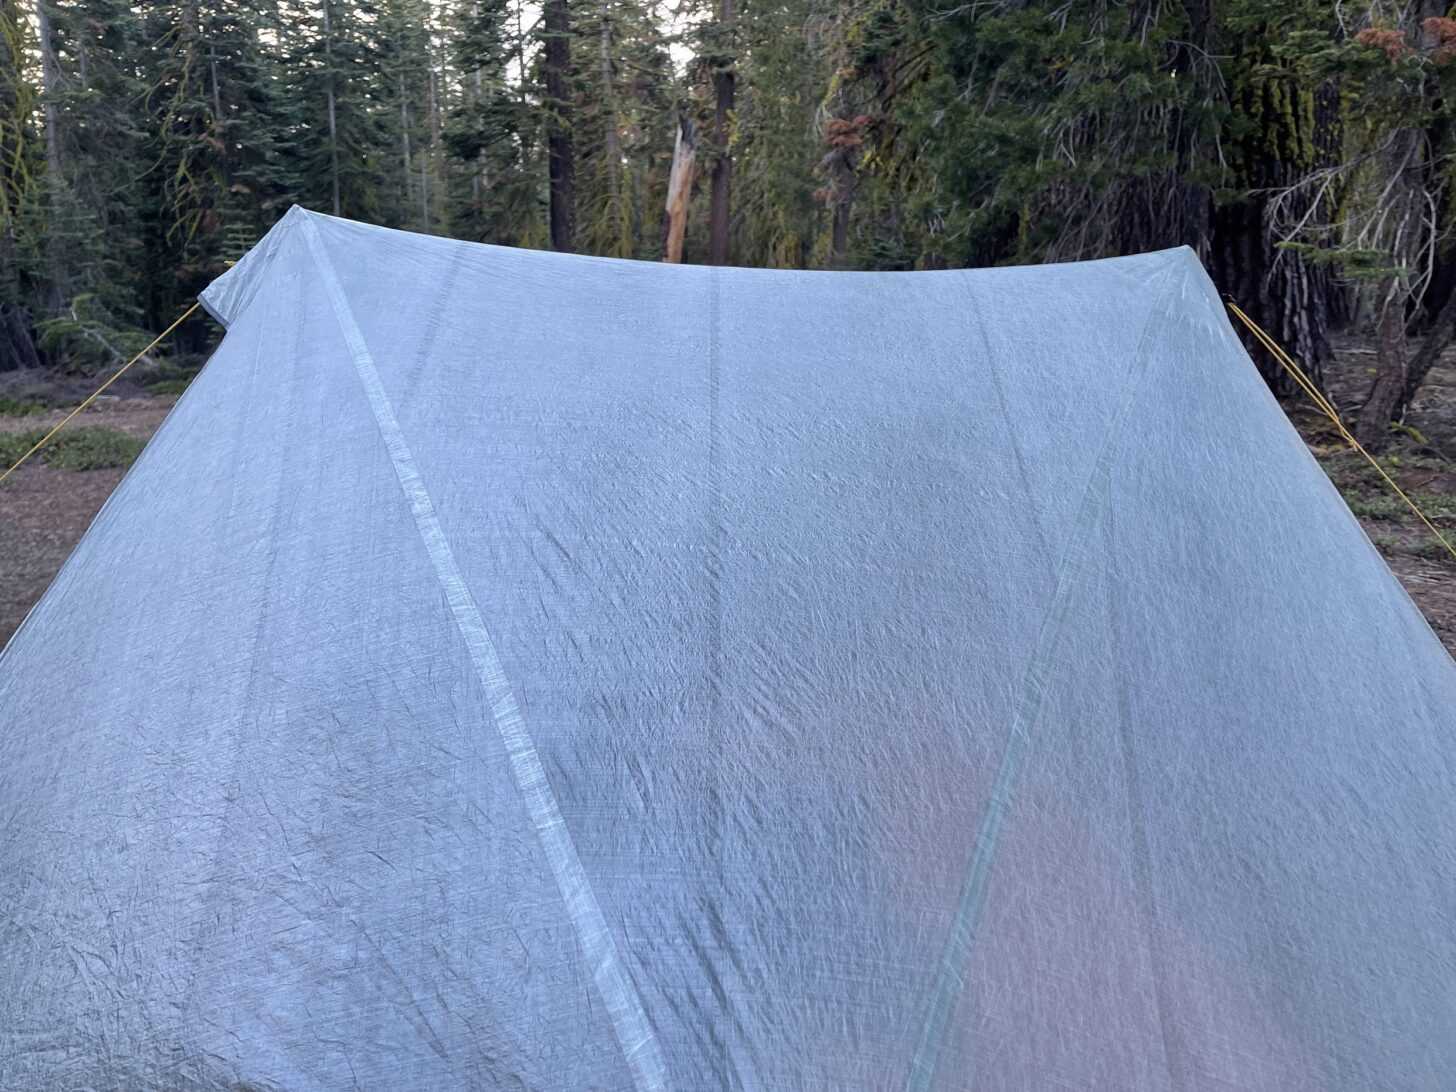 Deploying the apex guylines creates additional ridgeline tension and panel stability, shown here on the Tarptent Dipole 2 Li. Photo: Andrew Marshall
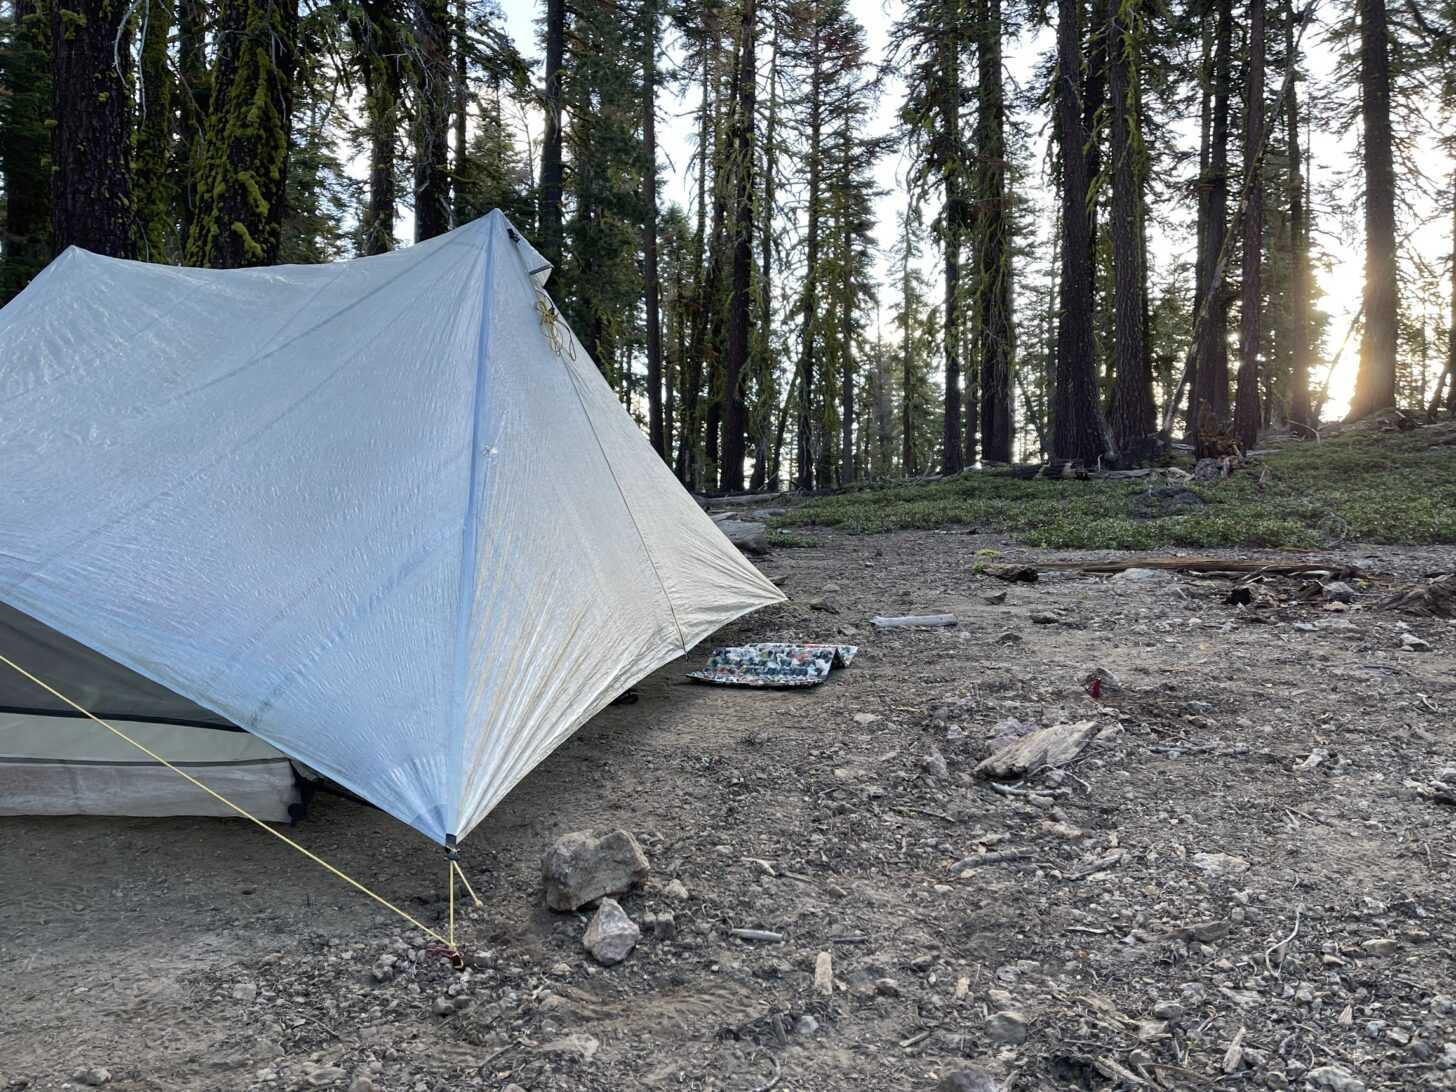 Sunset in the Tahoe Basin, Tarptent Dipole 2 Li. The apex guylines are not deployed. Note the slight sag in the ridgeline. This was my first pitch, and it was simply a result of not yet understanding how to perfect an effective 4-stake Dipole pitch – which didn’t take long. Photo: Andrew Marshall
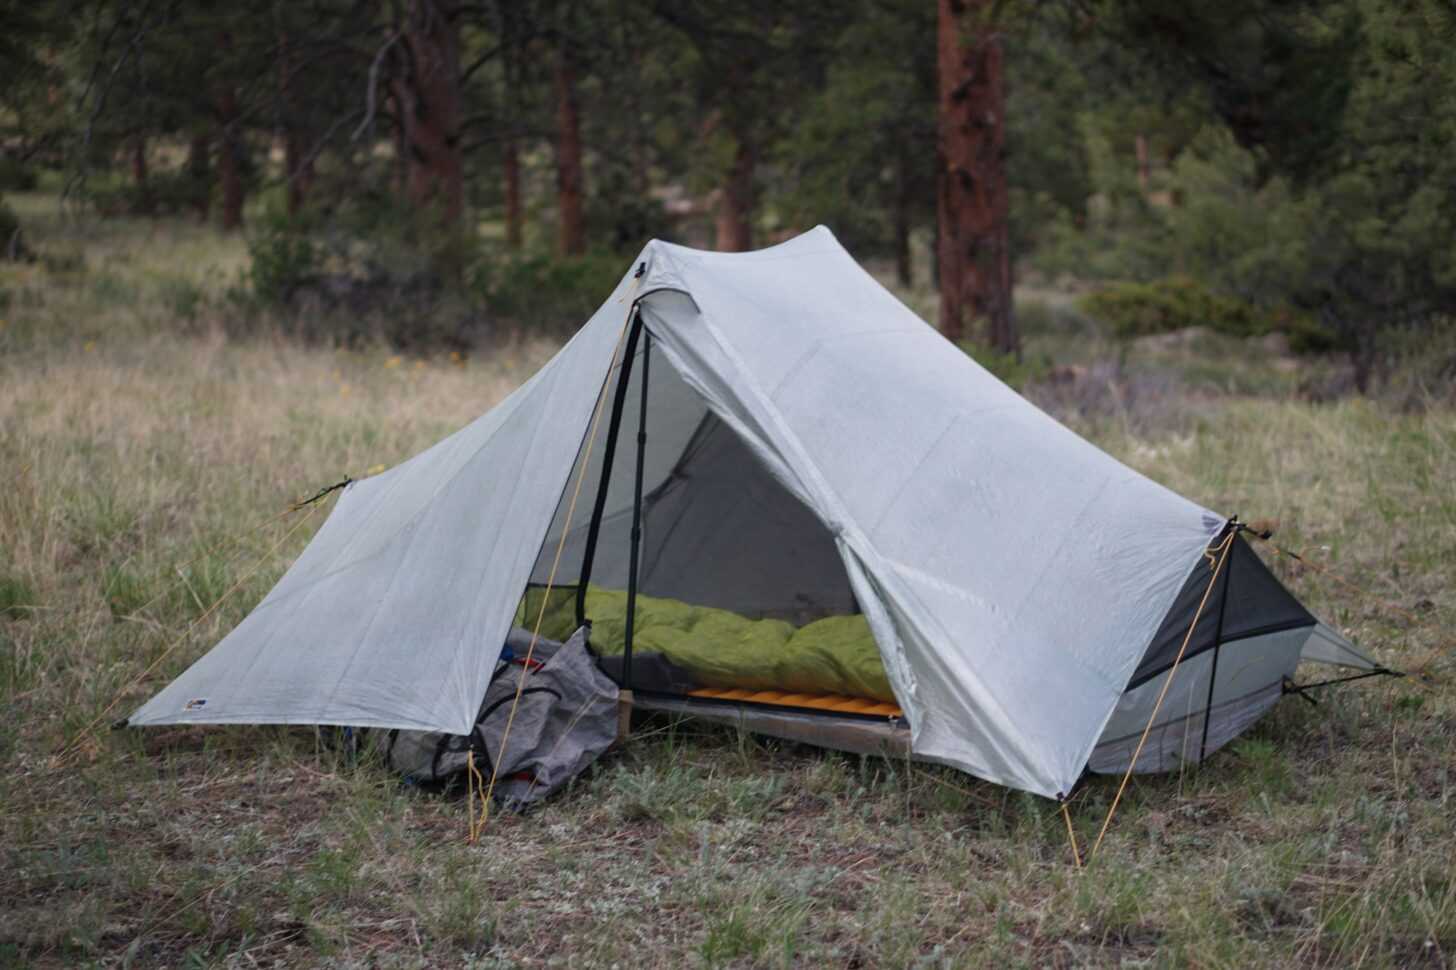 Tarptent Dipole 1 Li in the mountains northwest of Rocky Mountain National Park. Apex and end guylines are deployed here for a storm pitch. Photo: Ryan Jordan
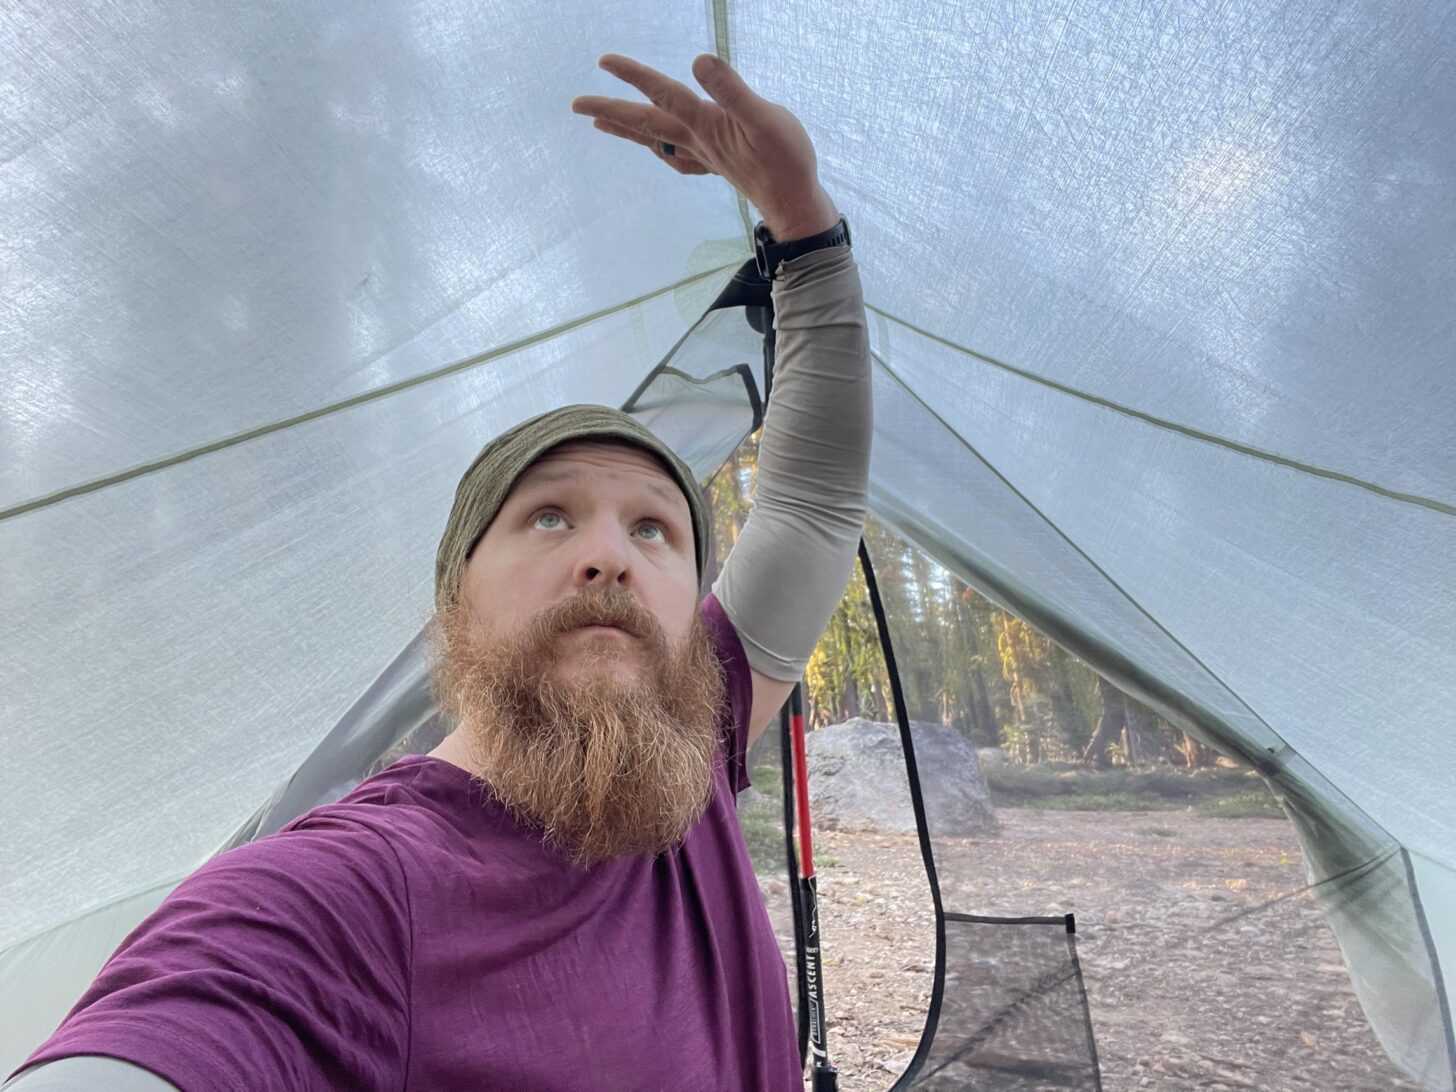 I (Andrew) am five feet six inches, so I almost always have headroom in tents. But the Tarptent Dipole 2 is roomy even by my short-man standards.
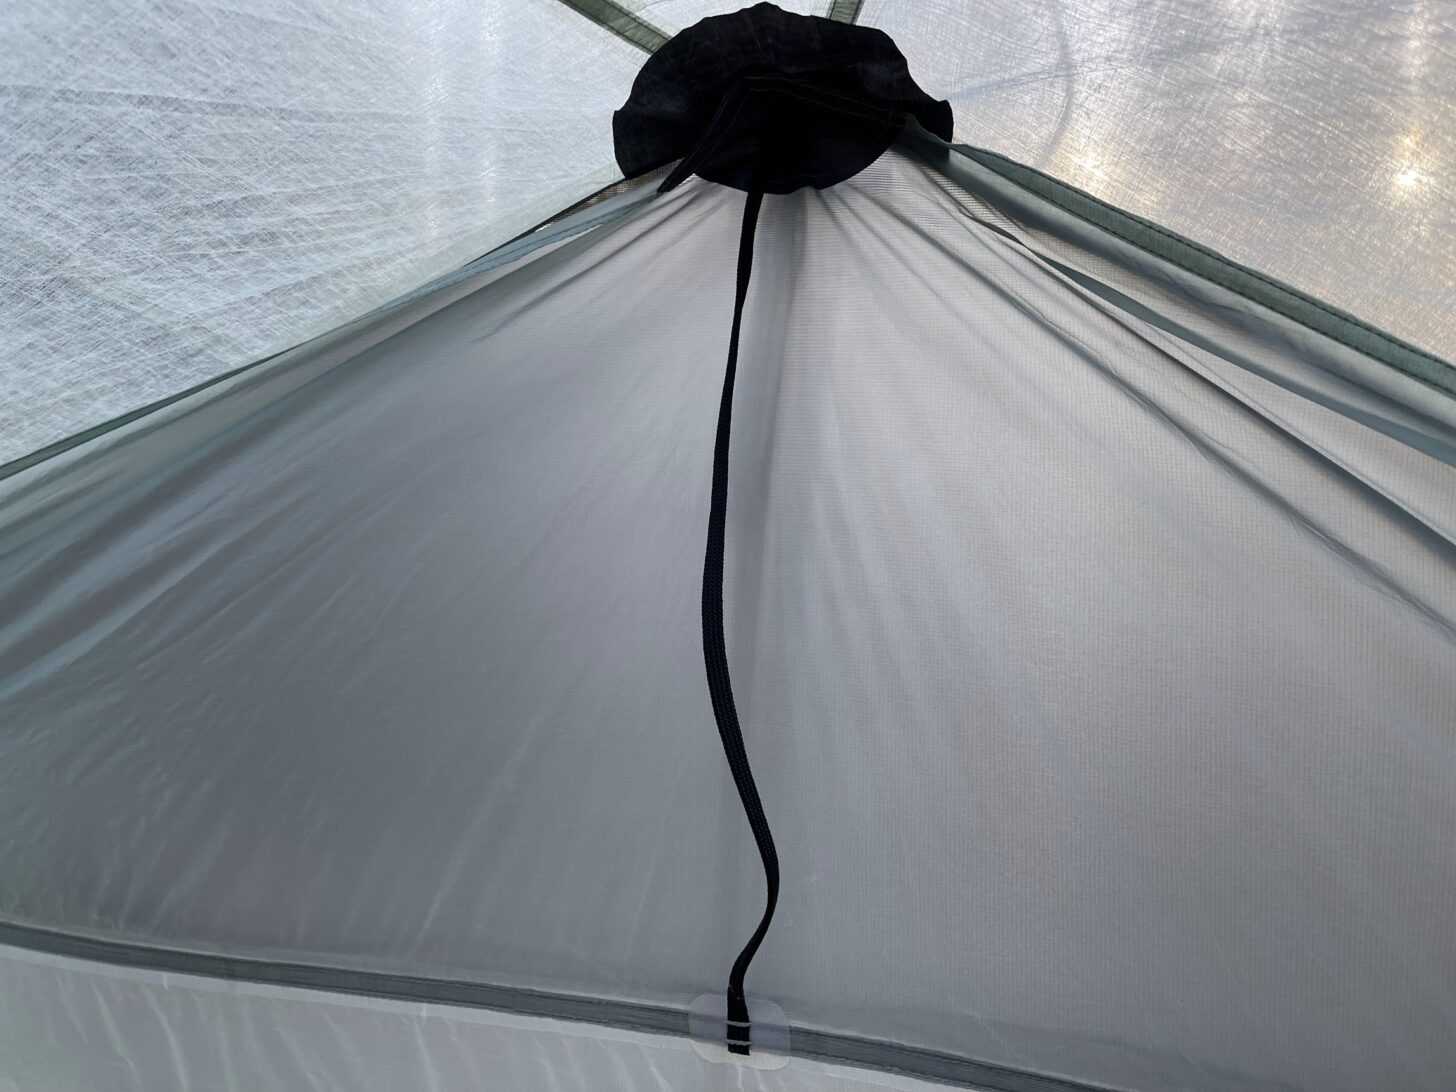 The sil-poly panel on the inside of one of the end vents. Photo: Andrew Marshall
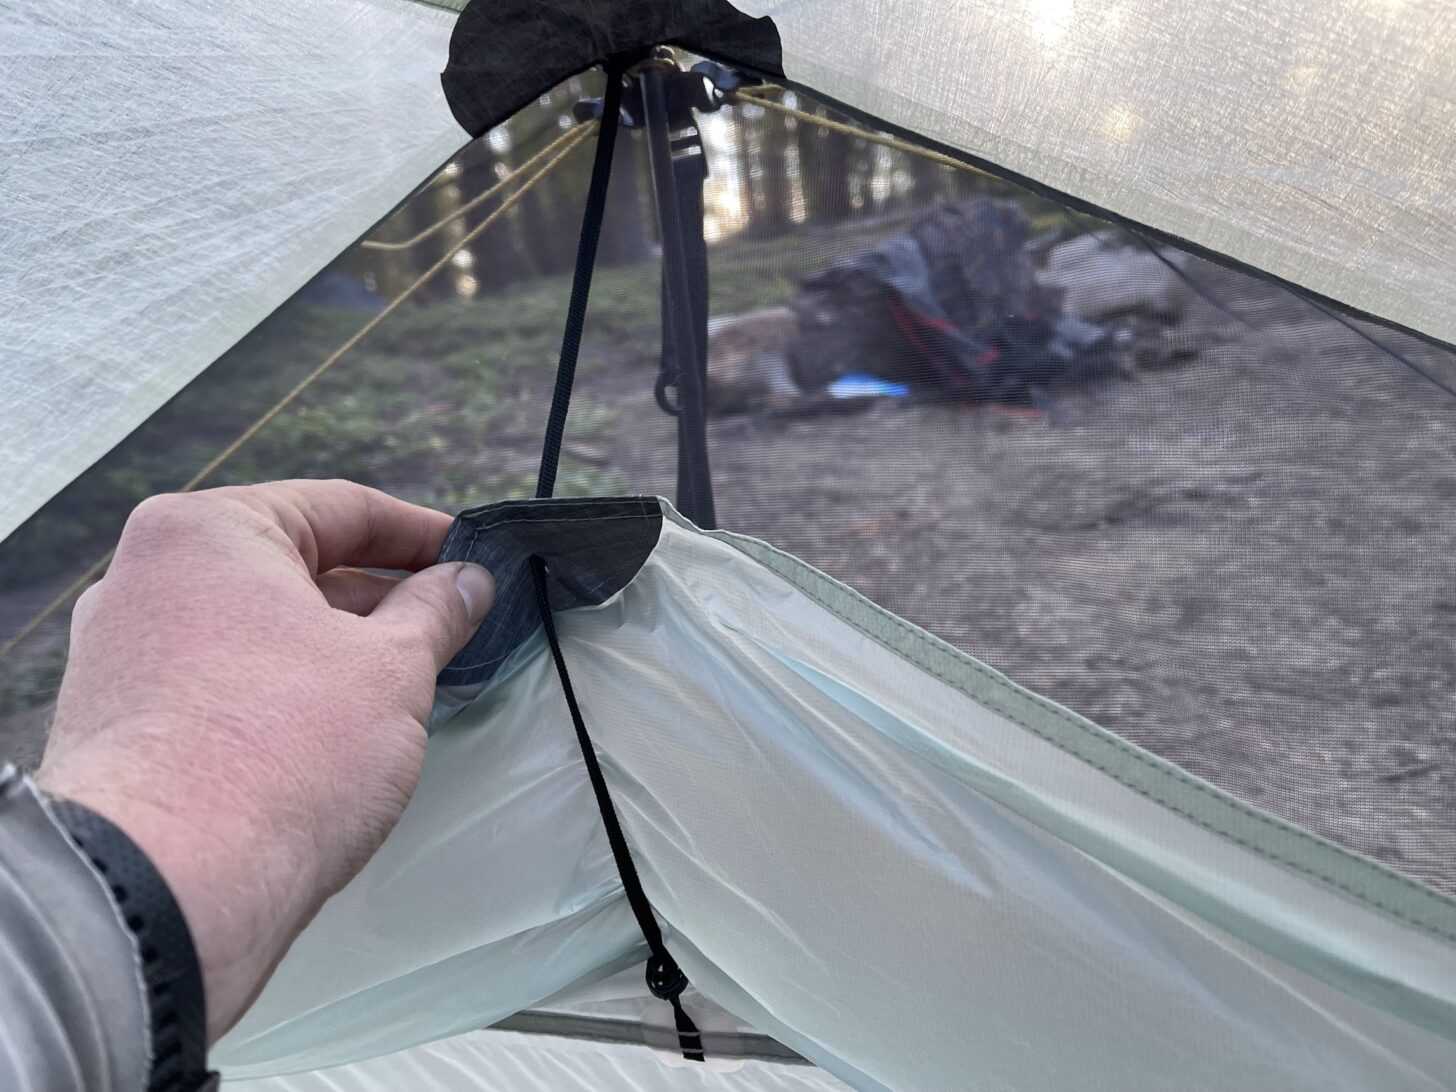 Opening the end vent on one end of the Tarptent Dipole 2 Li. In the production model, the cord that the vent cover slides up and down on will be made of Dyneema Composite Fabric so as not to absorb water. Photo: Andrew Marshall.
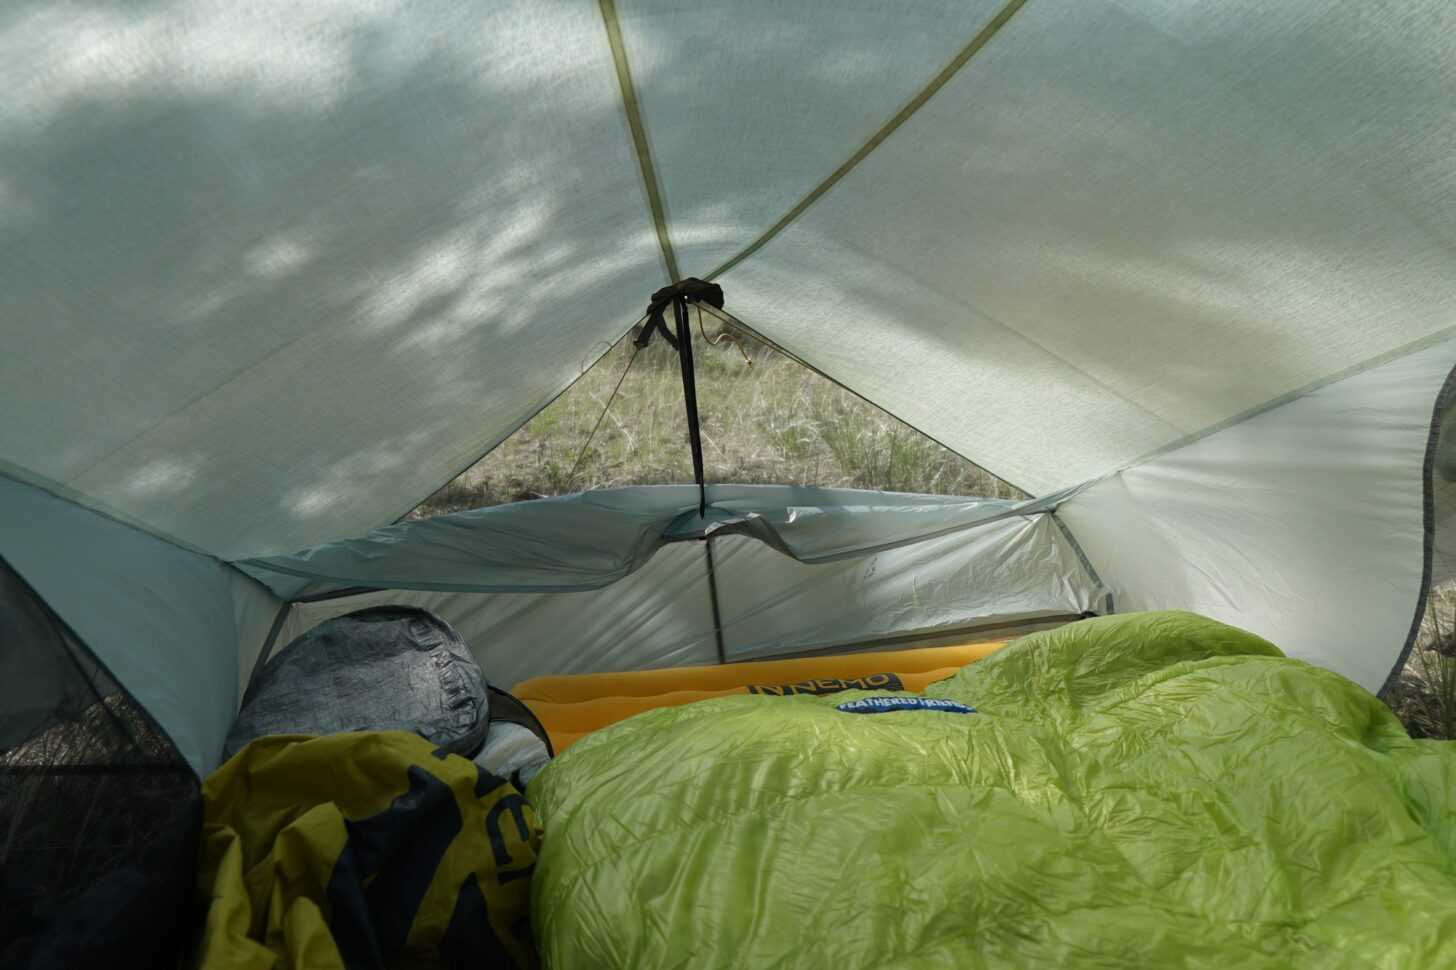 End vent on a Tarptent Dipole 1 Li. Even with a wide pad, there’s room to the sides of the pad at the head and foot ends of the tent to stash gear inside. Photo: Ryan Jordan
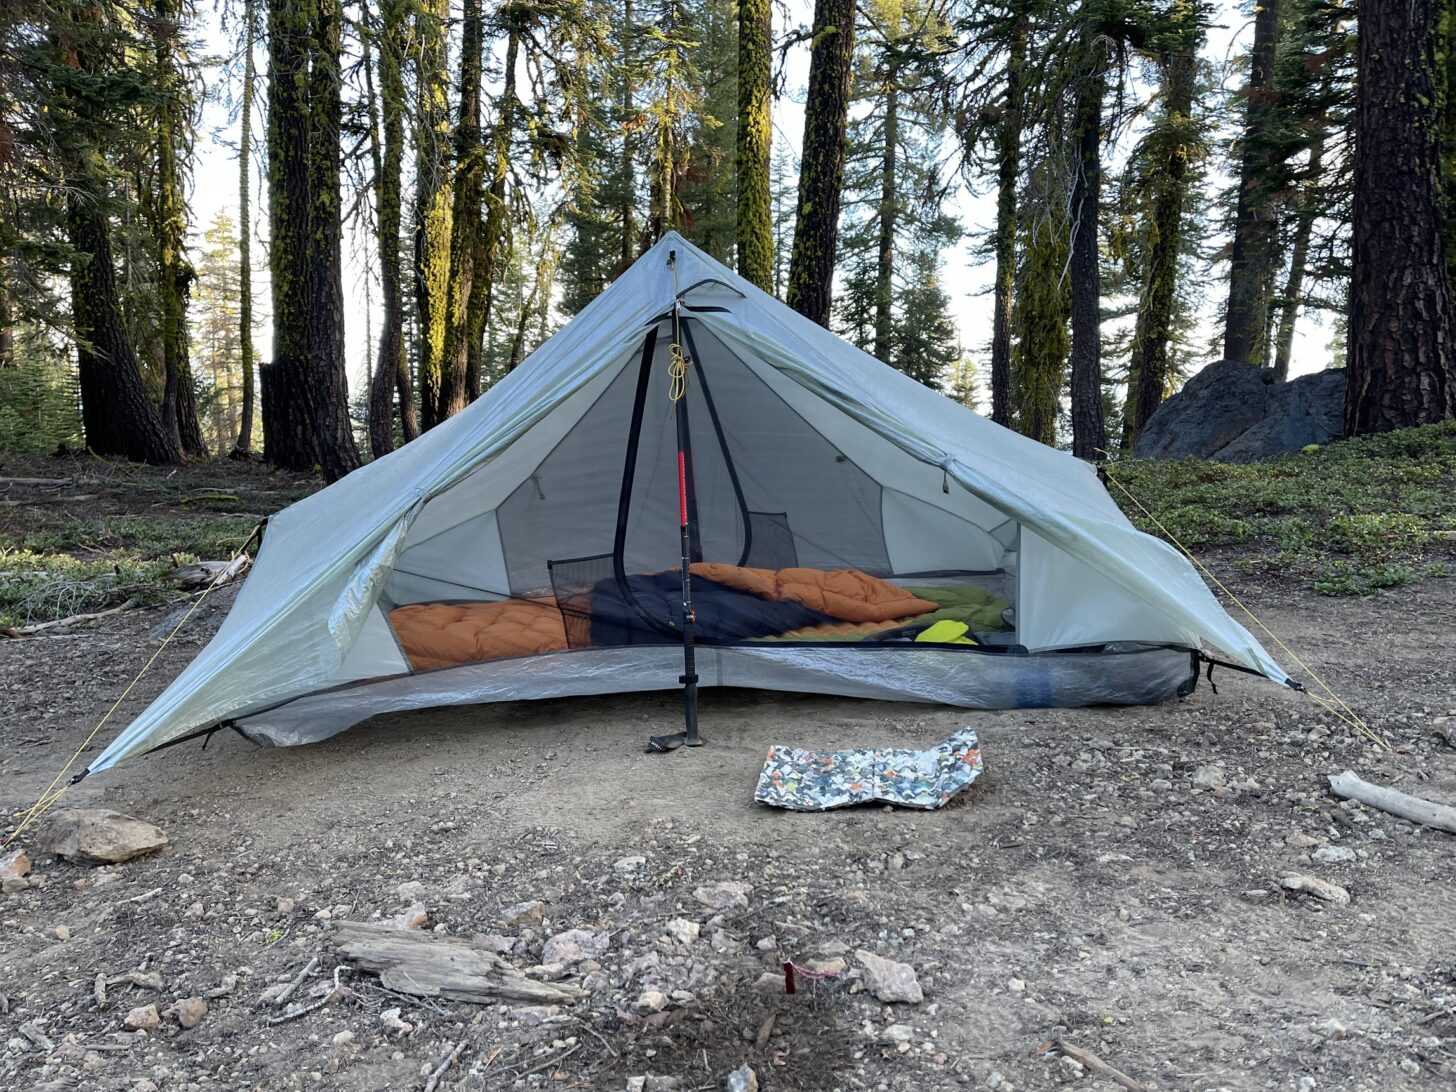
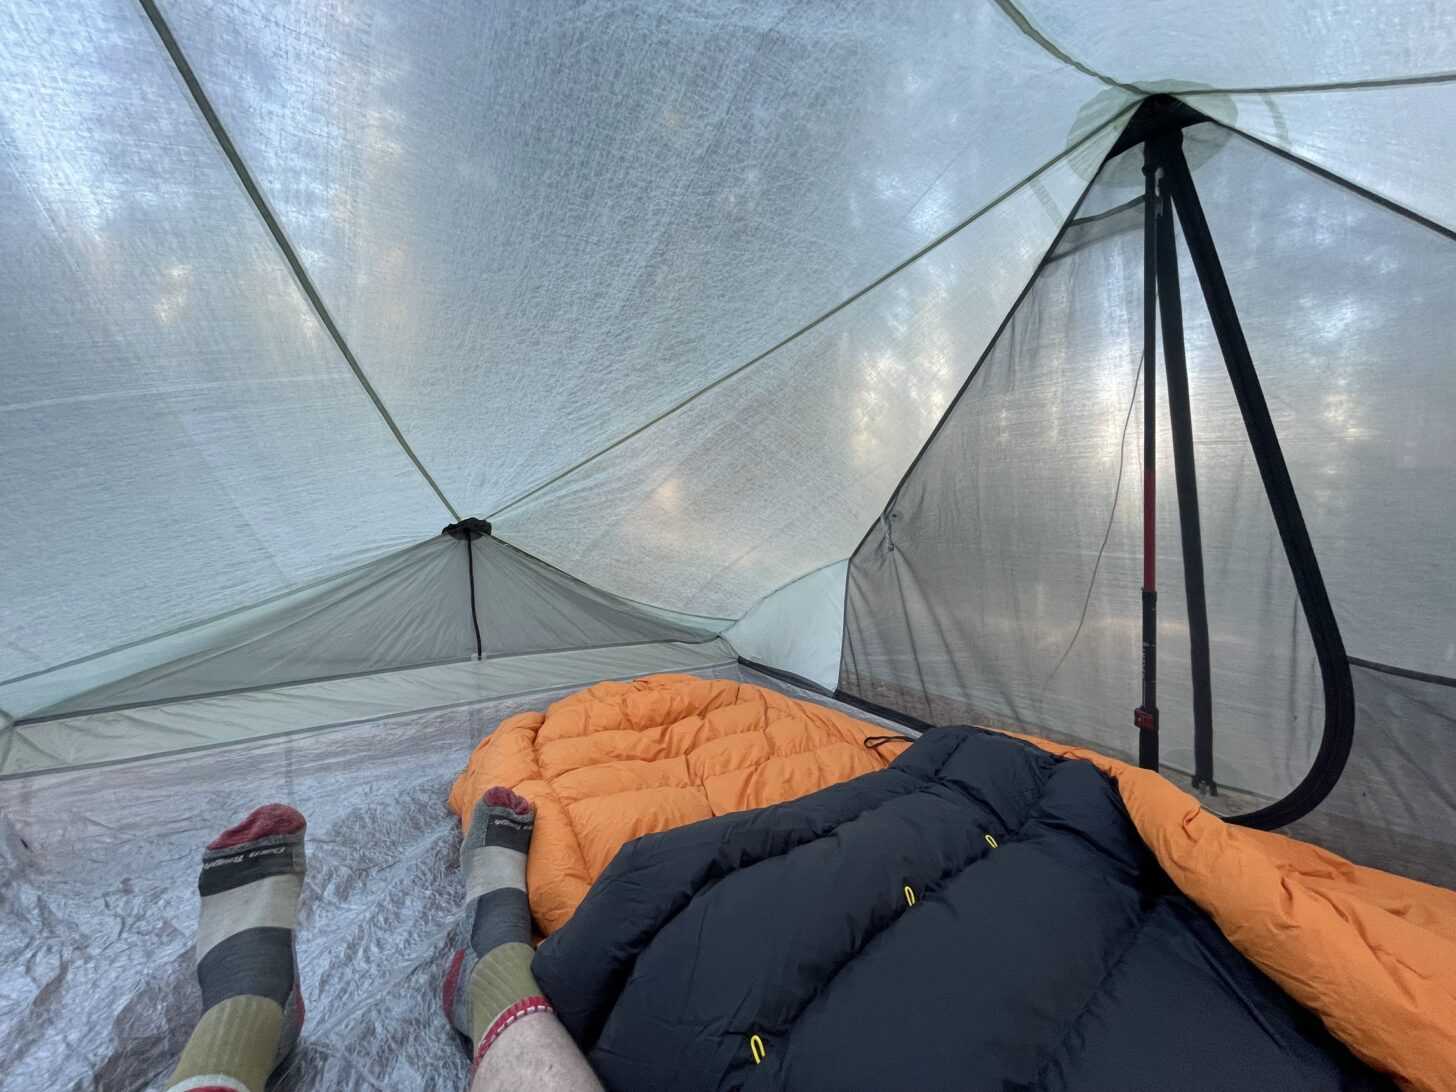 The spacious interior of the Tarptent Dipole 2 Li. This space in this photo is slightly exaggerated due to the use of a wide-angle lens, but only slightly. Photo: Andrew Marshall.
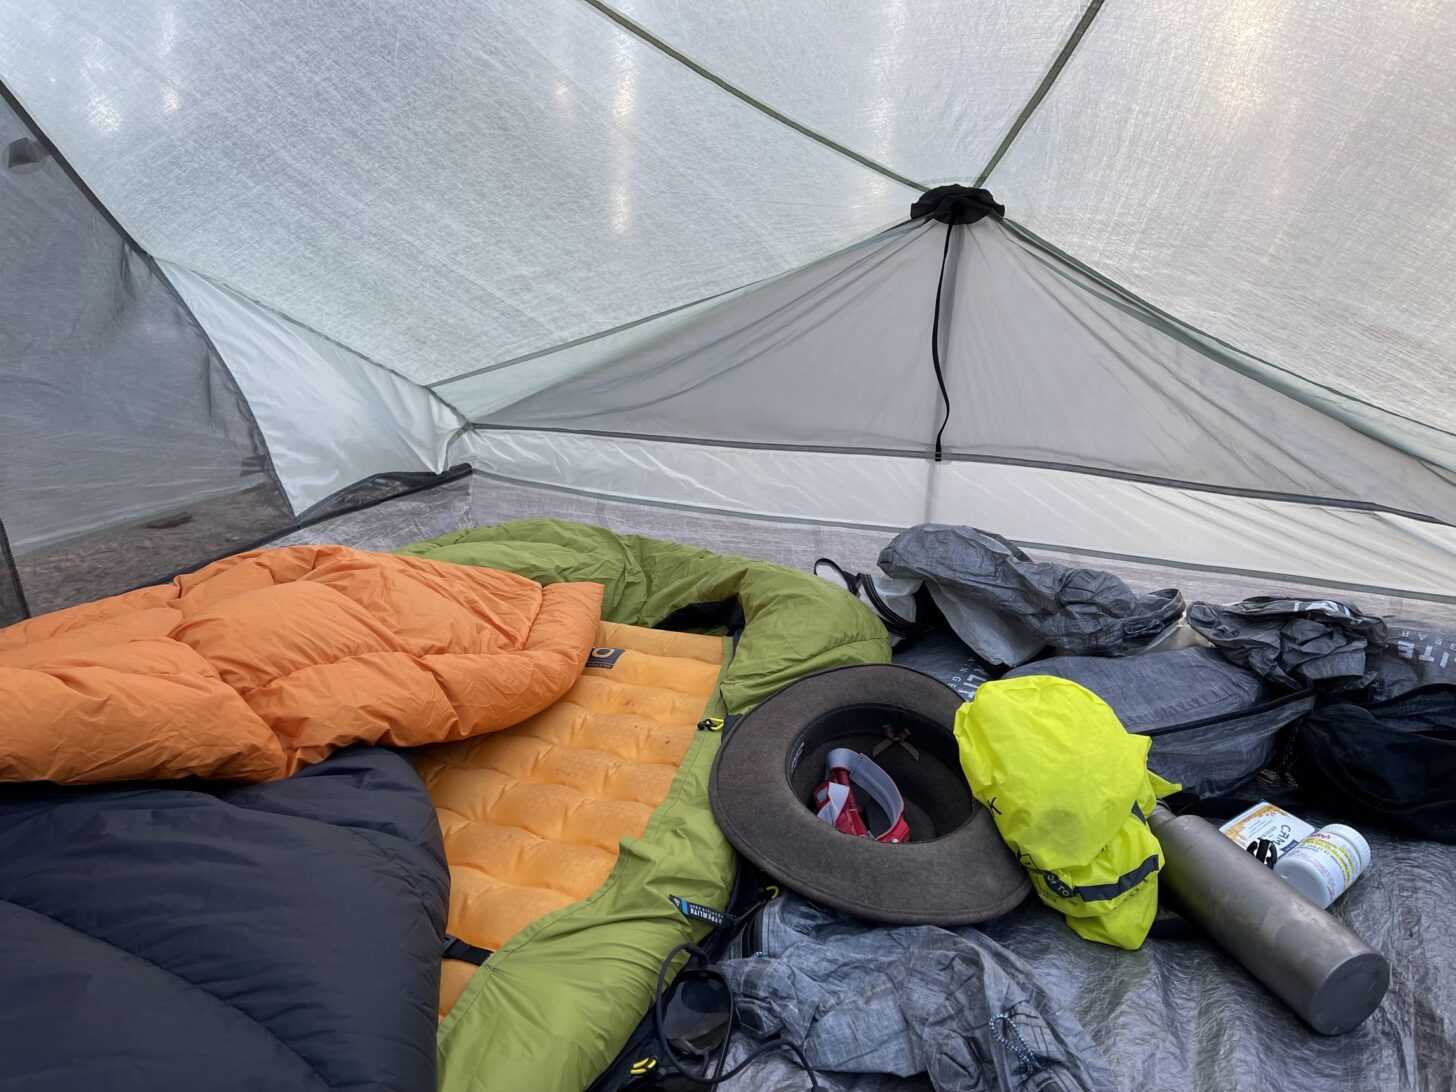 The Tarptent Dipole 2 Li is spacious for two persons. For one person, it’s a palace that can easily hold all of one’s gear for a long expedition AND a large dog, if necessary! Photo: Andrew Marshall
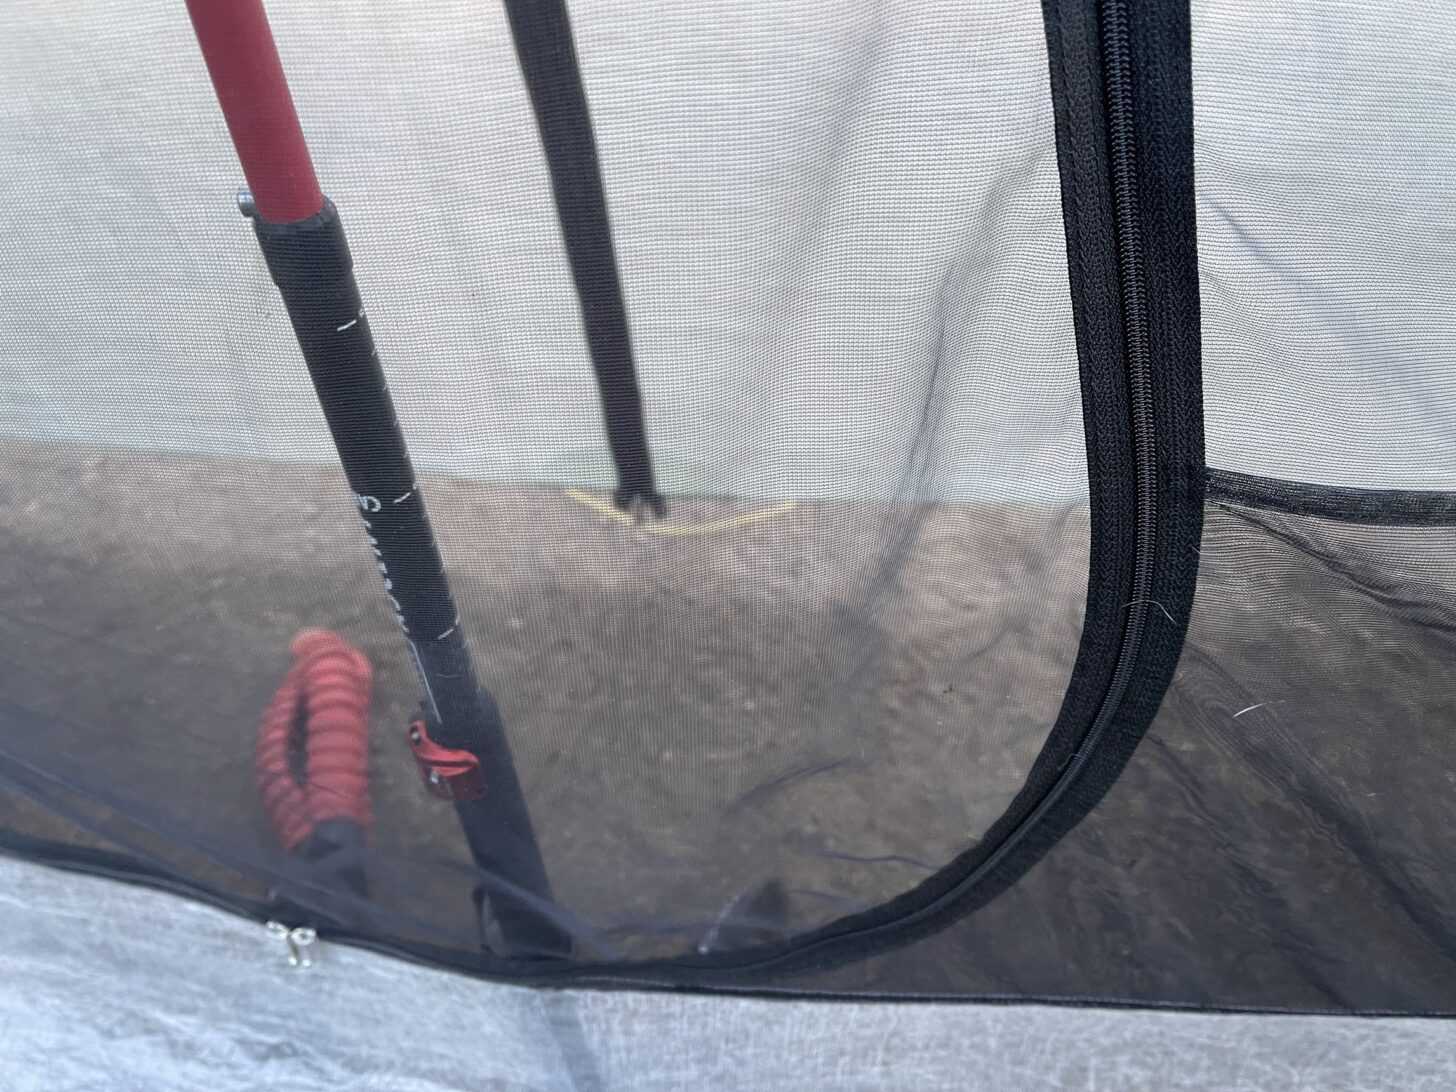 The vestibules are 17 inches (43 cm) deep and can be expanded with included guyline and hardware if needed – plenty of space to hold a large pack plus plenty of other wet gear. Photo: Andrew Marshall
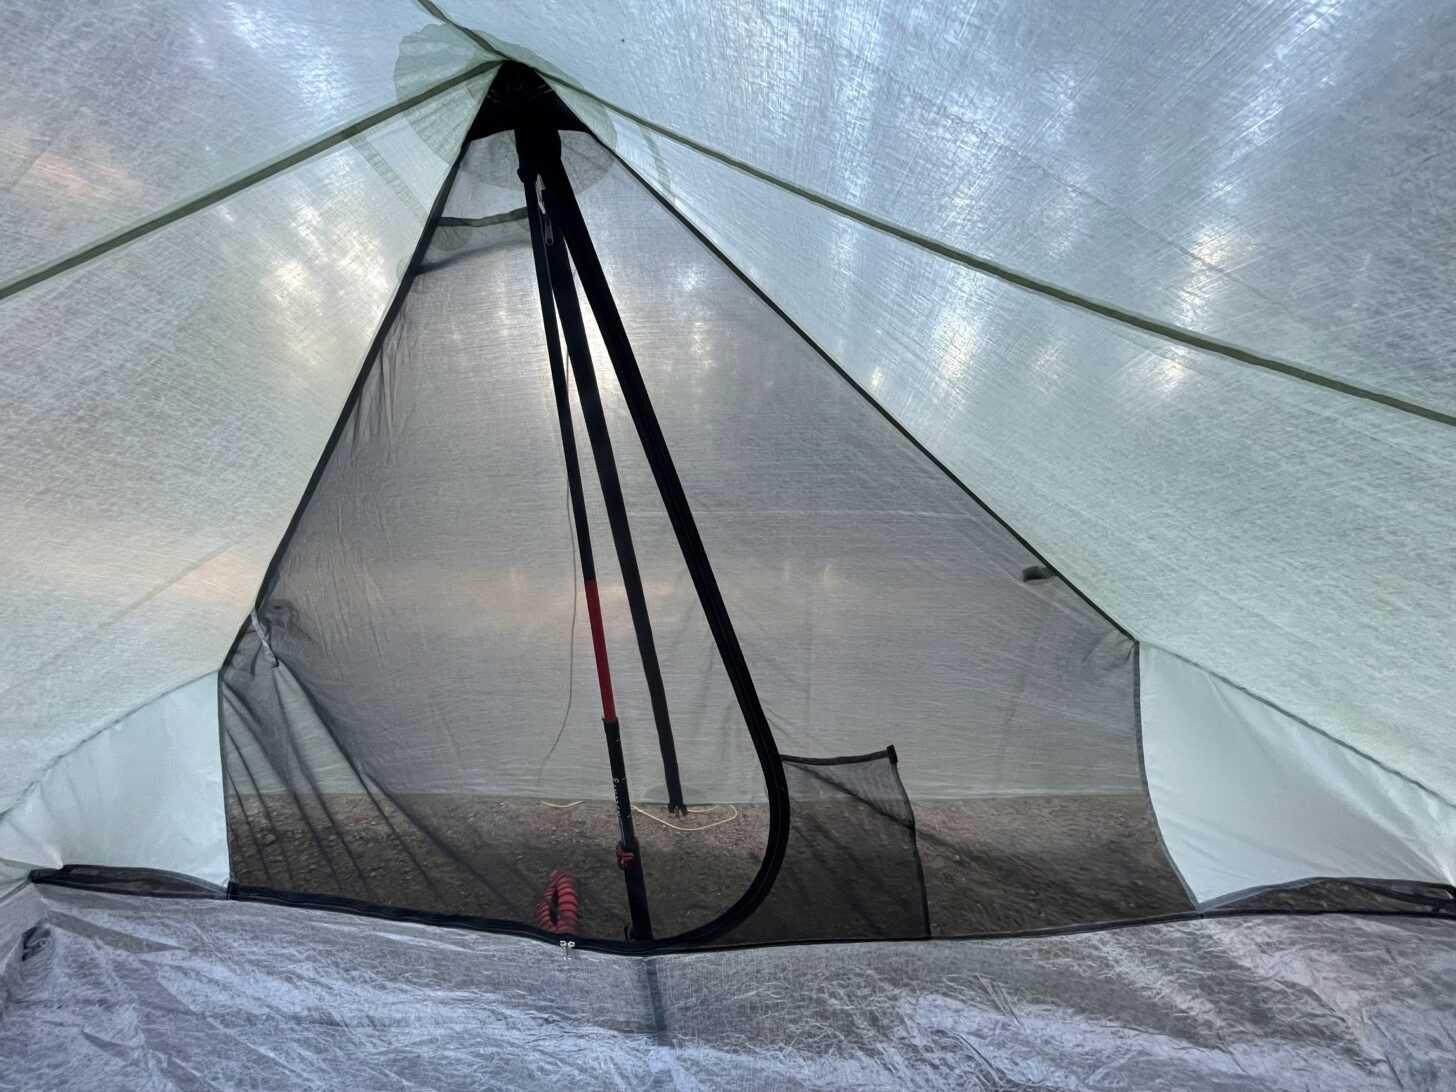 This wide-angle lens view from the interior of the Tarptent Dipole 2 Li shows the house-shaped mesh door flanked by two triangular silpoly end panels. Photo: Andrew Marshall
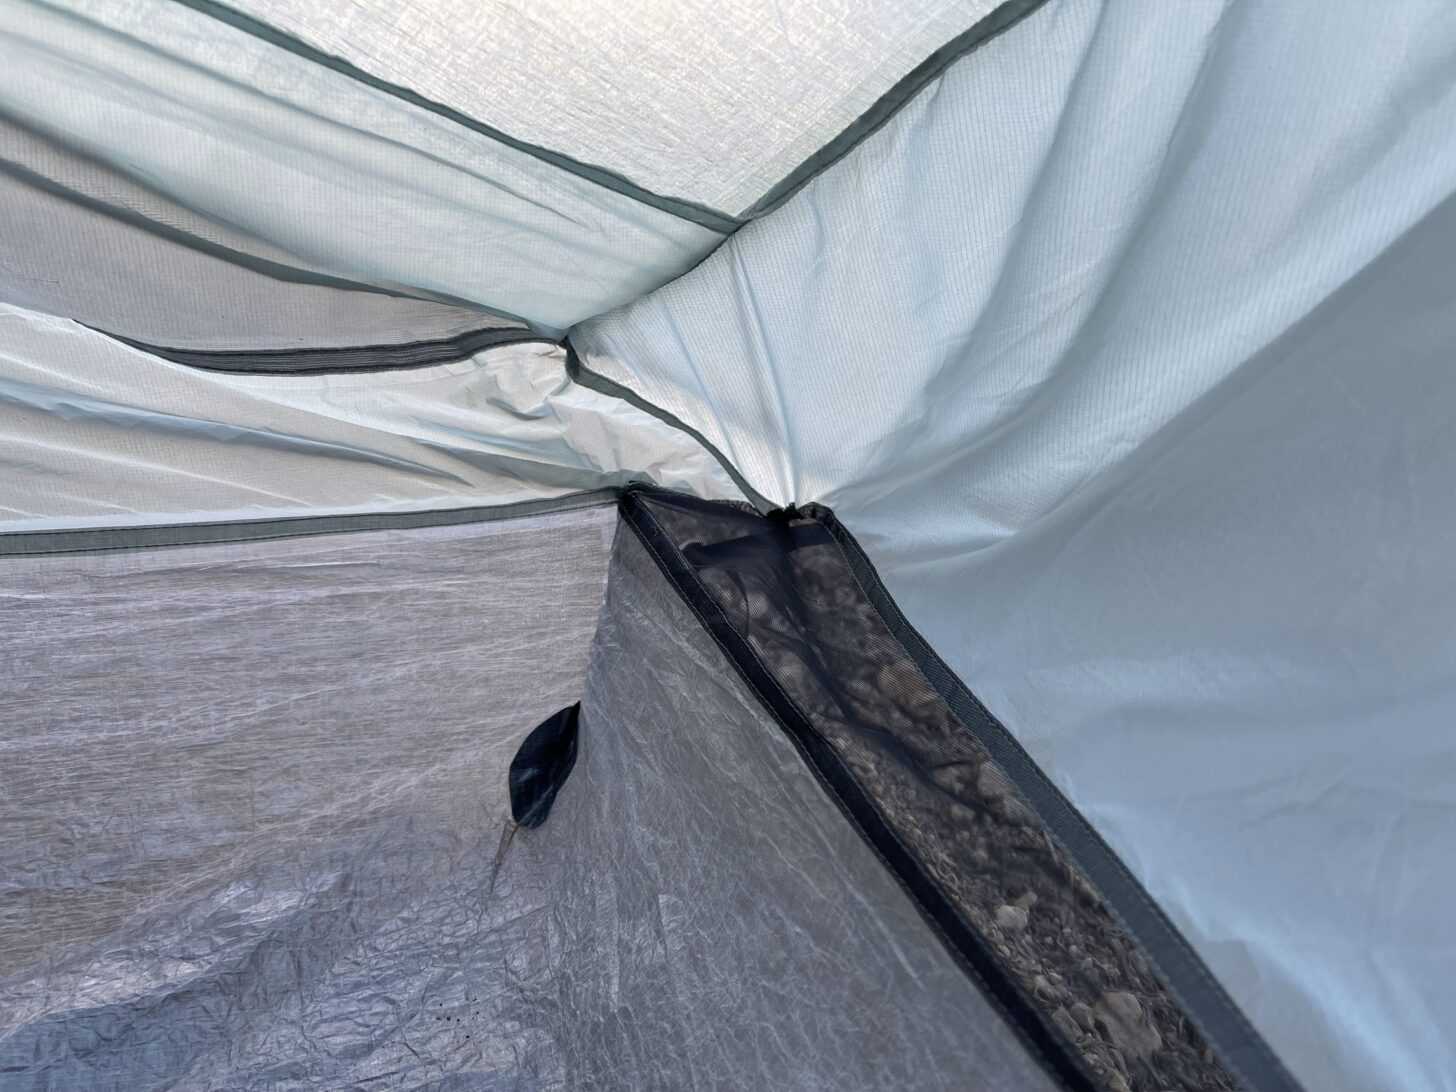 There’s a condensation drain at each of the four corners of the bathtub floor. Photo: Andrew Marshall
Многодиапазонный диполь Multi band dipole
Объяснения
В этой статье, в отличие от большинства других статей сайта, не описано
ничего нового авторской разработки. Это всего лишь записная книжка, в
которой хранятся снятые графики КСВ совершенно обычной, хорошо известной антенны:
диполя, запитанного по открытой двухпроводной линии. Я не имел намерения их
публиковать. Но часто после упоминания, что такие графики есть, просили их
показать. Вот чтобы больше не делать это индивидуально, и написана эта статья.
Антенна
Обычный диполь Inverted V, с плечами по 27 м (столько поместилось). Середина
на высоте 17 м над землей, края – по 5 м.

Линия питания двухпроводная, открытая, длиной ~30 м, сделанная по описанной
здесь технологии. Линия входит в
симметричный тюнер
MFJ
Versa Tuner V (обычный Т-тюнер с мощным симметрирующим балуном на кольцах
из порошкового железа на выходе).
Тюнер настраивается вручную на каждом диапазоне. А нередко, и перестраивается
в пределах диапазона. Зависимости КСВ от частоты на входе тюнера (т.е. то, что
видит трансивер или усилитель мощности) и приведены ниже в этой статье.
Они сняты антенным анализатором SARK-110. Эти
зависимости представляют интерес с той точки зрения, что показывают, насколько
часто надо перестраивать тюнер по диапазону, т.е. реальную полосу антенной
системы на всех измеренных частотах.
Поскольку эту полосу определяют три частотнозависимых элемента: сама антенна,
линия питания и тюнер, то вычислить её довольно сложно. А вот измерить относительно
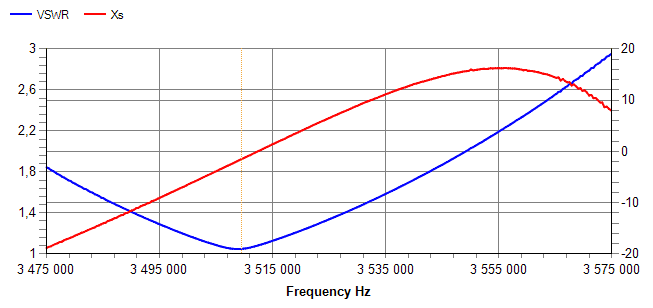
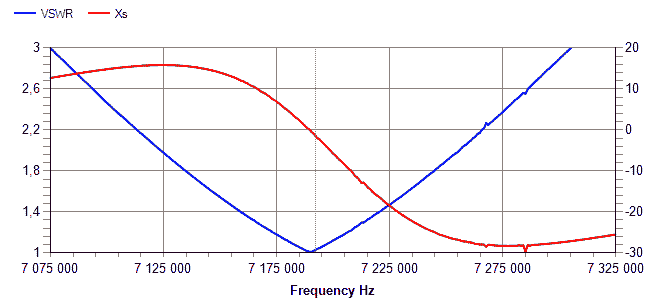
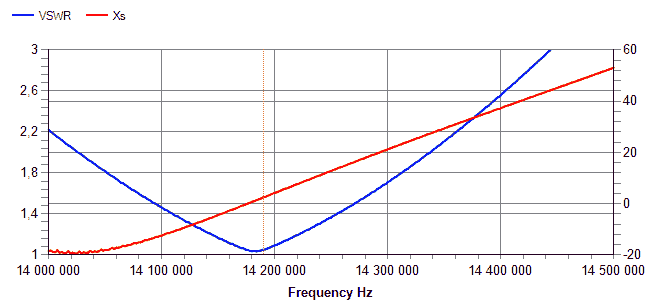
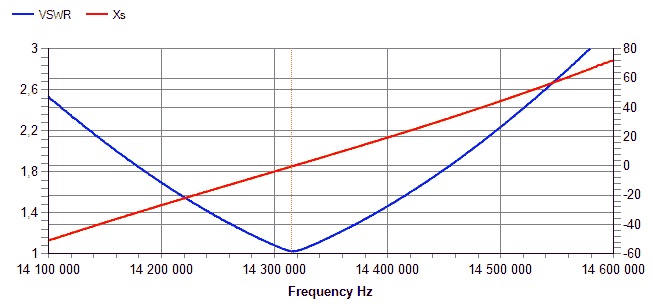
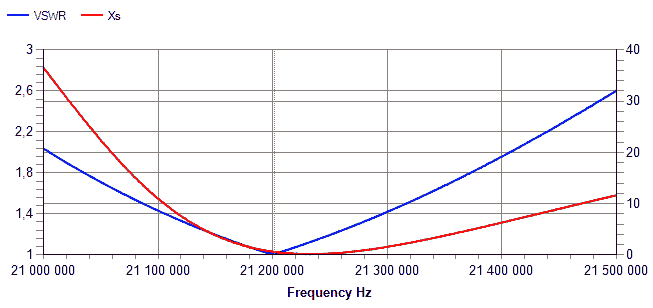
просто. Что и сделано ниже. На всех графиках синим показан КСВ, его шкала слева.
А красным со шкалой справа – реактивное сопротивление в омах (полезно для
оценки с чем придется столкнуться выходному каскаду).


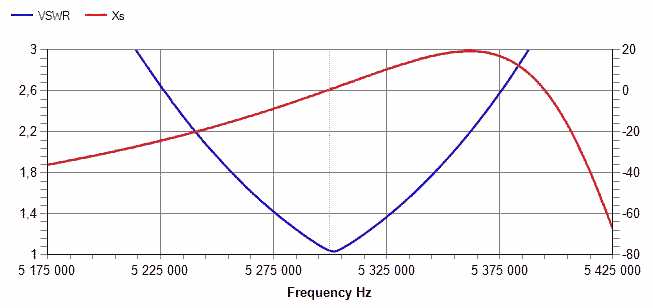
Диапазон 160 m
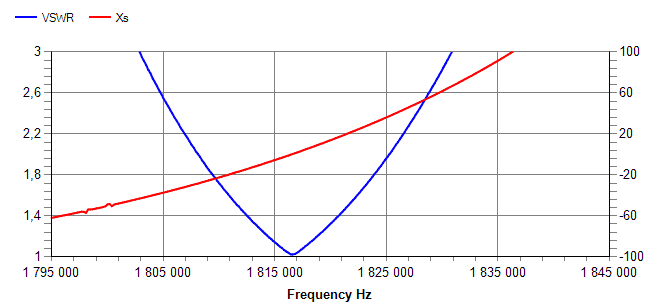
Поскольку сама антенна укорочена на этом диапазоне (размеры диполя всего
54 м), то и линия и тюнер работают с высокой реактивностью и добротностью.
Поэтому полоса получается весьма узкой. Тюнер надо подстраивать при изменении
частоты на 10…15 кГц.
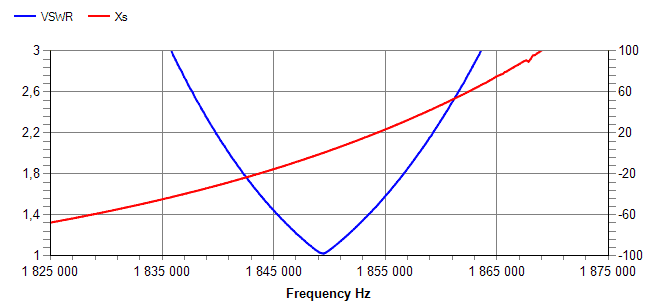
Диапазон 80 m

Здесь сама антенна больше половины длины волны, но диапазон широкий, поэтому
перестройка между CW, RTTY, SSB обычным и SSB DX необходима.
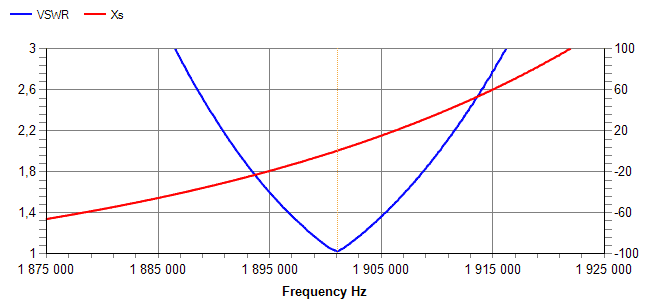
Диапазон 60 m
Этот диапазон кое-где разрешен. А там где не разрешен, послушать его интересно.
Диапазон узкий, подстройка тюнера не требуется.


Полоса по КСВ < 1,5 около 70 кГц поэтому тоже требуется перестройка между
CW, началом SSB участка и его концом.

Диапазон узкий, подстройка тюнера не требуется.
Диапазон 20 m
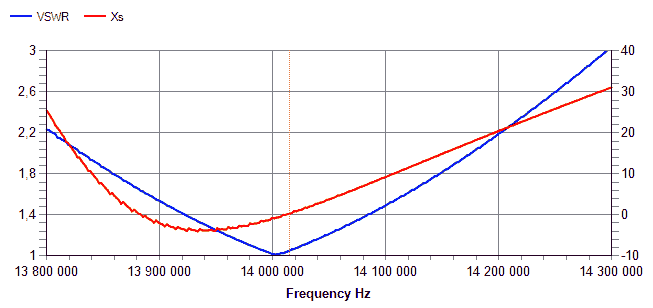
Электрическая длина антенны велика. При изменении частоты от
14 до 14,3 МГц длина меняется от 2,66λ до 2,717λ. Вычитая целое
число полуволн (которые не прибавляют реактивности), получаем изменение
электрической длины на 5,7% λ, что приводит к заметному изменению
входной реактивности. Поэтому требуется подстройка по диапазону: СW,
середина диапазона, верхний край SSB участка.

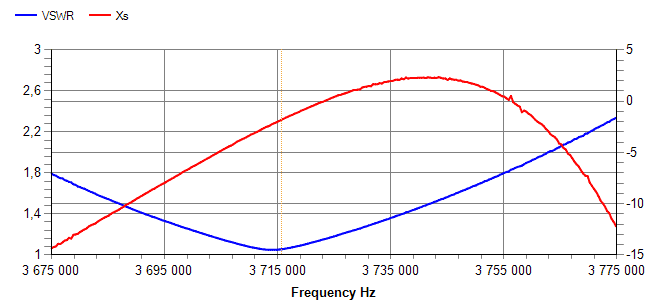
Диапазон узкий, подстройка тюнера не требуется.

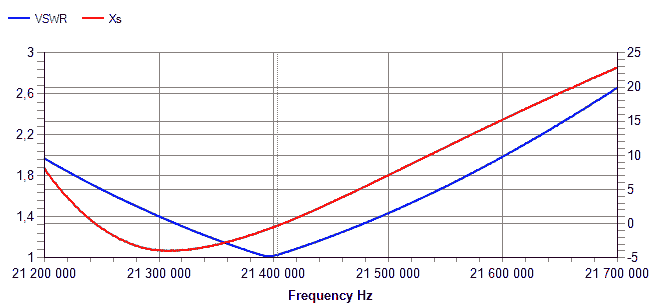
Как и в диапазоне 20 m требуется аналогичная подстройка по диапазону.
По тем же причинам.
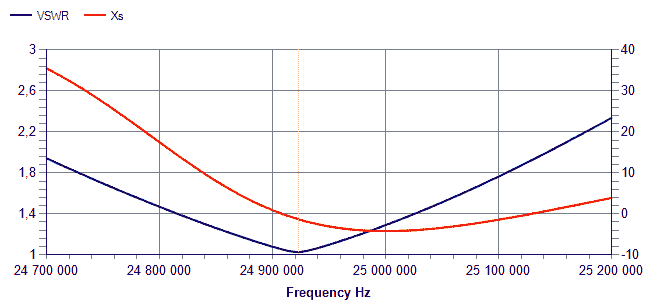
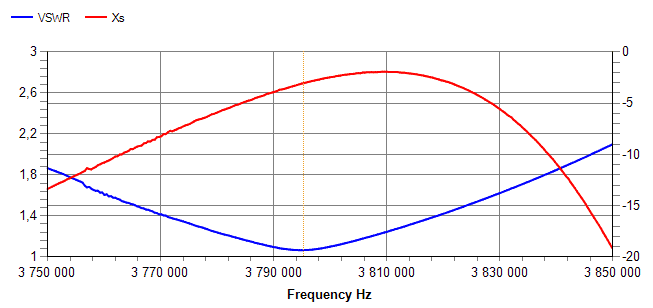
Диапазон узкий, подстройка тюнера не требуется.
Диапазон 10 m

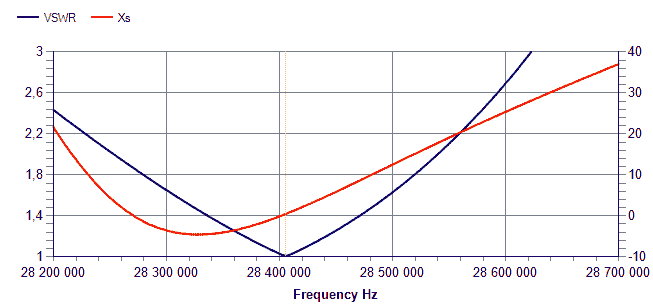
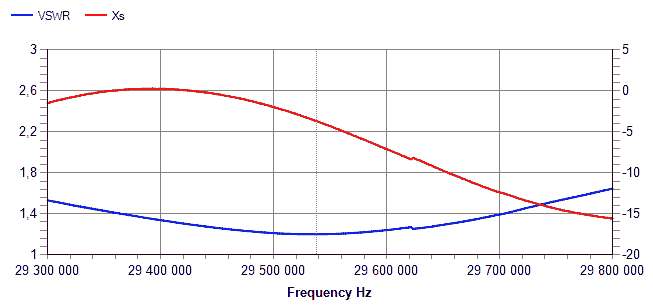
Как и в диапазоне 20 m требуется аналогичная подстройка по диапазону.
По тем же причинам. Кроме того, здесь на верхнем краю начинают сказываться
паразитные емкости тюнера поэтому на 29,55 МГц не удается получить КСВ ниже
1,25.
Выводы
Антенна универсальна и может быть настроена на любую частоту от 1,8 до 29,7 МГц.
Это безусловный плюс.
Но на всех диапазонах кроме узких WARC и экзотического
60 m требует перестройки по диапазону. Это с одной стороны неудобно (снижает
оперативность), но с другой – антенная система является узкополосным
преселектором, повышающим реальную избирательность приемника
(особенно на НЧ диапазонах).
При замене тюнера на автоматический с памятью исчезает неудобство потери
оперативности при перестройке. Правда стоят такие тюнеры немало, а на высокую
мощность совсем дорого.
Если вместо перестраиваемого тюнера применять набор отдельных согласующих
цепей, то на всех диапазонах, кроме WARC придется использовать хотя бы по 2
(а лучше — по 3) отдельные цепи на CW и SSB. Т.е. потребуется несколько
десятков реле высокой мощности. Бюджетным такое решение никак не назовешь.


На некоторых из приведенных графиков видны маленькие зубцы. Это следствие
принятых антенной помех. Измерения проводились поздно вечером, поэтому
уровень сигналов на антенне был достаточно велик. Тем не менее,
SARK-110 из-за своей
высокой помехозащищенности вполне
справился и влияние помех с антенны на измерения оказалось пренебрежимо мало.
Агро-пустынь, 18.05.2016
На главную — Main page